Introduction
OpenVMM is a modular, cross-platform, general-purpose Virtual Machine Monitor (VMM), written in Rust.
The project is open-source, MIT Licensed, and developed publicly at microsoft/openvmm on GitHub.
Cross-Platform
OpenVMM supports a variety of host operating systems, architectures, and virtualization backends:
| Host OS | Architecture | Virtualization API |
|---|---|---|
| Windows | x64 / Aarch64 | WHP (Windows Hypervisor Platform) |
| Linux | x64 | KVM |
| x64 | MSHV (Microsoft Hypervisor) | |
| macOS | Aarch64 | Hypervisor.framework |
| Linux (paravisor) | x64 / Aarch64 | MSHV (using VSM / TDX / SEV-SNP) |
General Purpose
Similar to other general-purpose VMMs (such as Hyper-V, QEMU, VirtualBox), OpenVMM is able to host a wide variety of both modern and legacy guest operating systems on-top of its flexible virtual hardware platform.
-
Modern operating systems can boot via UEFI, and interface with a wide selection of paravirtualized devices for services like networking, storage, and graphics.
-
Legacy x86 operating systems can boot via BIOS, and are presented with a PC-compatible emulated device platform which includes legacy hardware such as IDE hard-disk/optical drives, floppy disk drives, and VGA graphics cards.
OpenVMM is regularly tested to ensure compatibility with popular operating systems (such as Windows, Linux, and FreeBSD), and strives to maintain reasonable compatibility with other, more niche/legacy operating systems as well.
Modular
OpenVMM is designed from the ground up to support a wide variety of distinct virtualization scenarios, each with their own unique needs and constraints.
Rather than relying on a "one size fits all" solution, the OpenVMM project enables users to build specialized versions of OpenVMM with the precise set of features required to power their particular scenario.
For example: A build of OpenVMM designed to run on a user's personal PC might compile-in all available features, in order support a wide variety of workloads, whereas a build of OpenVMM designed to run linux container workloads might opt for a narrow set of enabled features, in order to minimize resource consumption and VM-visible surface area.
One particularly notable use-case of OpenVMM is in OpenHCL (AKA, OpenVMM as a paravisor).
Unlike in traditional virtualization, where a VMM runs in a privileged host/root partition and provides virtualization services to a unprivileged guest partition, the "paravisor" model enables a VMM to provide virtualization services from within the guest partition itself.
It can be considered a form of "virtual firmware", running at a higher privilege level than the primary guest OS.
Paravisors are quite exciting, as they enable a wide variety of useful and novel virtualization scenarios! For example: at Microsoft, OpenHCL plays a key role in enabling several important Azure scenarios:
-
Enabling existing workloads to seamlessly leverage Azure Boost (Azure's next-generation hardware accelerator), without requiring any modifications to the guest VM image.
-
Enabling existing guest operating systems to run inside hardware-backed Confidential VMs.
-
Powering Trusted Launch VMs - VMs that support Secure Boot, and include a vTPM.
To learn more about different facets of the OpenVMM project, check out the following links:
| Getting Started: OpenVMM | Running OpenVMM as traditional host VMM |
| Getting Started: OpenHCL | Running OpenVMM as a paravisor (OpenHCL) |
| Developer Guide: Getting Started | Building OpenVMM / OpenHCL locally |
| [Github] microsoft/openvmm | Viewing / Downloading OpenVMM source code |
| [Github] OpenVMM issue tracker | Reporting OpenVMM issues |
OpenVMM
OpenVMM can be configured to run as a conventional hosted, or "type-2" Virtual Machine Monitor (VMM).
At the moment, OpenVMM can be built and run on the following host platforms:
| Host OS | Architecture | Virtualization API |
|---|---|---|
| Windows | x64 / Aarch64 | WHP (Windows Hypervisor Platform) |
| Linux | x64 | KVM |
| x64 | MSHV (Microsoft Hypervisor) | |
| macOS | Aarch64 | Hypervisor.framework |
When compiled, OpenVMM consists of a single standalone openvmm / openvmm.exe
executable.1
Note: As you explore the OpenVMM repo, you may find references to the term HvLite.
HvLite was the former codename for OpenVMM, so whenever you see the term "HvLite", you can treat it as synonymous to "OpenVMM".
We are actively migrating existing code and docs away from using the term "HvLite".
Notable Features
This non-exhaustive list provides a broad overview of some notable features, devices, and scenarios OpenVMM currently supports.
- Boot modes
- UEFI - via
microsoft/mu_msvmfirmware - BIOS - via the Hyper-V PCAT BIOS firmware
- Linux Direct Boot
- UEFI - via
- Devices
- Paravirtualized
- Direct Assigned (experimental, WHP only)
- Emulated
- vTPM
- NVMe
- Serial UARTs (both 16550, and PL011)
- Legacy x86
- i440BX + PIIX4 chipset (PS/2 kbd/mouse, RTC, PIT, etc)
- IDE HDD/Optical, Floppy
- PCI
- VGA graphics (experimental)
- Device backends
- Graphics / Mouse / Keyboard (VNC)
- Serial (term, socket, tcp)
- Storage (raw img, VHD/VHDx, Linux blockdev, HTTP)
- Networking (various)
- Management APIs (unstable)
- CLI
- Interactive console
- gRPC
- ttrpc
For more information on any / all of these features, see their corresponding pages under the Reference section of the OpenVMM Guide.
...though, as you may be able to tell by looking at the sidebar, that section of the Guide is currently under construction, and not all items have corresponding pages at this time.
DISCLAIMER
Before heading on to Running OpenVMM, please take a moment to read and understand the following important disclaimer:
In recent years, development efforts in the OpenVMM project have primarily focused on OpenHCL (AKA: OpenVMM as a paravisor).
As a result, not a lot of "polish" has gone into making the experience of running OpenVMM in traditional host contexts particularly "pleasant".
This lack of polish manifests in several ways, including but not limited to:
- Unorganized and minimally documented management interfaces (e.g: CLI, ttrpc/grpc)
- Unoptimized device backend performance (e.g: for storage, networking, graphics)
- Unexpectedly missing device features (e.g: legacy IDE drive, PS/2 mouse features)
- No API or feature-set stability guarantees whatsoever.
At this time, OpenVMM on the host is not yet ready to run end-user workloads, and should should be treated more akin to a development platform for implementing new OpenVMM features, rather than a ready-to-deploy application.
though, depending on the platform and compiled-in feature-set, some
additional DLLs and/or system libraries may need to be installed (notably:
lxutil.dll on Windows).
Running OpenVMM
This page offers a high-level overview of different ways to launch and interact with OpenVMM.
These examples are by no means "exhaustive", and should be treated as a useful jumping-off point for subsequent self-guided experimentation with OpenVMM.
Obtaining a copy of OpenVMM
To get started, ensure you have a copy of the OpenVMM executable and its runtime dependencies, via one of the following options:
Building OpenVMM Locally
Follow the instructions on: Building OpenVMM.
Pre-Built Binaries
If you would prefer to try OpenVMM without building it from scratch, you can download pre-built copies of the binary from OpenVMM CI.
Simply select a successful pipeline run (should have a Green checkbox), and
scroll down to select an appropriate *-openvmm artifact for your particular
architecture and operating system.
On Windows: You must also download a copy of lxutil.dll from
microsoft/openvmm-deps
on GitHub, and ensure it is in the same directory as openvmm.exe.
Examples
These examples all use
cargo run --, with the assumption that you are a developer building your own copy of OpenVMM locally!To run these examples using a pre-compiled copy of OpenVMM, swap
cargo run --with/path/to/openvmm.
If you run into any issues, please refer to Troubleshooting.
Preface: Quitting OpenVMM
By default, OpenVMM will connect the guests's COM1 serial port to the current terminal session, forwarding all keystrokes directly to the VM.
As such, a simple ctrl-c does not suffice to quit OpenVMM!
Instead, you can type crtl-q to enter OpenVMM's interactive console, and enter q to quit.
Sample Linux Kernel, via direct-boot
This example will launch Linux via direct boot (i.e: without going through UEFI
or BIOS), and appends single to the kernel command line.
The Linux guest's console will be hooked up to COM1, and is relayed to the host terminal by default.
To launch Linux with an interactive console into the shell within initrd, simply run:
cargo run
This works by setting the default [env] vars in .cargo/config.toml to
configure OpenVMM to use a set of pre-compiled test kernel + initrd images,
which are downloaded as part of the cargo xflowey restore-packages command.
Note that this behavior only happens when run via cargo run (as cargo is the
tool which ensures the required env-vars are set).
The source for the sample kernel + initrd can be found on the microsoft/openvmm-deps repo.
The kernel and initrd can be controlled via options:
--kernel <PATH>: The kernel image. Must be an uncompressed kernel (vmlinux, not bzImage).--initrd <PATH>: The initial ramdisk image.-c <STRING>or--cmdline <STRING>: Extra kernel command line options, such asroot=/dev/sda.
Windows, via UEFI
This example will launch a modern copy of Windows via UEFI, using the mu_msvm
firmware package.
A copy of the mu_msvm UEFI firmware is automatically downloaded via cargo xflowey restore-packages.
cargo run -- --uefi --disk memdiff:path/to/windows.vhdx --gfx
For more info on --gfx, and how to actually interact with the VM using a
mouse/keyboard/video, see the Graphical Console
docs.
The file windows.vhdx can be any format of VHD(X).
Note that OpenVMM does not currently support using dynamic VHD/VHDX files on Linux hosts. Unless you have a fixed VHD1 image, you will need to convert the image to raw format, using the following command:
qemu-img convert -f vhdx -O raw windows.vhdx windows.img
Also, note the use of memdiff, which creates a memory-backed "differencing
disk" shim between the VMM and the backing disk image, which ensures that any
writes the VM makes to the VHD are not persisted between runs. This is very
useful when iterating on OpenVMM code, since booting the VM becomes repeatable
and you don't have to worry about shutting down properly. Use file instead for
normal persistent storage.
DOS, via PCAT BIOS
While DOS in particular is not a scenario that the OpenVMM has heavily invested in, the fact DOS is able to boot in OpenVMM serves as a testament to OpenVMM's solid support of legacy x86 devices and infrastructure.
The following command will boot a copy of DOS from a virtual floppy disk, using the Hyper-V PCAT BIOS.
Booting via PCAT is not just for DOS though! Many older operating systems, including older copies of Windows / Linux, require booting via BIOS.
cargo run -- --pcat --gfx --floppy memdiff:/path/to/msdos.vfd --pcat-boot-order=floppy,optical,hdd
OpenVMM Troubleshooting
This page includes a miscellaneous collection of troubleshooting tips for common issues you may encounter when running OpenVMM.
If you are still running into issues, consider filing an issue on the OpenVMM GitHub Issue tracker.
failed to open /dev/kvm/
Error:
fatal error: failed to launch vm worker

Caused by:
    0: failed to launch worker
    1: failed to create the prototype partition
    2: kvm error
    3: failed to open /dev/kvm
    4: Permission denied (os error 13)
Solution:
When launching from a Linux/WSL host, your user account will need permission to
interact with /dev/kvm.
For example, you could add yourself to the group that owns that file:
sudo usermod -a -G <group> <username>
For this change to take effect, you may need to restart. If using WSL2, you can
simply restart WSL2 (run wsl --shutdown from Powershell and reopen the WSL
window).
Alternatively, for a quick-and-dirty solution that will only persist for the duration of the current user session:
sudo chown <username> /dev/kvm
Next Steps
To learn more about how OpenVMM works, and how to interact with it:
| Reference: OpenVMM Features | Configure and interact with OpenVMM |
| Dev Guide: Building OpenVMM | Build OpenVMM locally |
| Reference: OpenVMM Architecture | Understand how OpenVMM works "under the hood" |
OpenHCL
OpenHCL is an execution environment which runs OpenVMM as a paravisor.
Unlike in traditional virtualization, where a VMM runs in a privileged host/root partition and provides virtualization services to a unprivileged guest partition, the "paravisor" model enables a VMM to provide virtualization services from within the guest partition itself.
It can be considered a form of "virtual firmware", running at a higher privilege level than the primary guest OS.
Paravisors are quite exciting, as they enable a wide variety of useful and novel virtualization scenarios! For example: at Microsoft, OpenHCL plays a key role in enabling several important Azure scenarios:
-
Enabling existing workloads to seamlessly leverage Azure Boost (Azure's next-generation hardware accelerator), without requiring any modifications to the guest VM image.
-
Enabling existing guest operating systems to run inside hardware-backed Confidential VMs.
-
Powering Trusted Launch VMs - VMs that support Secure Boot, and include a vTPM.
To learn more about OpenHCL's architecture, please refer to OpenHCL Architecture.
Note: As you explore the OpenVMM repo, you may find references to the term Underhill.
Underhill was the former codename for OpenHCL, so whenever you see the term "Underhill", you can treat it as synonymous to "OpenHCL".
We are actively migrating existing code and docs away from using the term "Underhill".
Running OpenHCL
This chapter provides a high-level overview of different ways to launch and interact with OpenHCL.
High-level Overview
In order to run OpenHCL, an existing host VMM must first load the OpenHCL environment into a VM, much akin to existing virtual firmware layers, like UEFI, or BIOS1.
OpenHCL is distributed as an IGVM file (Independent Guest Virtual Machine), which encapsulates all the directives and data required to launch a particular virtual machine configuration on any given virtualization stack.
At this time, the only VMMs which are able to load and host OpenHCL IGVM files are Hyper-V, and OpenVMM.
Obtaining a copy of OpenHCL
To get started, ensure you have a copy of an OpenHCL IGVM firmware image, via one of the following options:
Building OpenHCL Locally
Follow the instructions on: Building OpenHCL.
Note: At this time, OpenHCL can only be built on Linux / WSL2.
Pre-Built Binaries
If you would prefer to try OpenHCL without building it from scratch, you can download pre-built copies of OpenHCL IGVM files from OpenVMM CI.
Simply select a successful pipeline run (should have a Green checkbox), and
scroll down to select an appropriate *-openhcl-igvm artifact for your
particular architecture and operating system.
Though, unlike UEFI / BIOS, OpenHCL is loaded into a distinct, higher privilege execution context within the VM, called VTL2.
Windows - Hyper-V
Hyper-V has support for running with OpenHCL when running on Windows. This is the closest configuration to what Microsoft ships in Azure VMs, the only difference being that Azure uses Azure Host OS (as opposed to Windows Client or Windows Server).
Get a Windows version that has development support for OpenHCL
Note that Windows Client and Windows Server do not have production support for OpenHCL VMs (Microsoft does not support production workloads on OpenHCL VMs on Windows Client and Windows Server), but certain versions have development support for OpenHCL VMs (they can be used as developer platforms for the purposes of using/testing/developing OpenHCL).
Windows Client
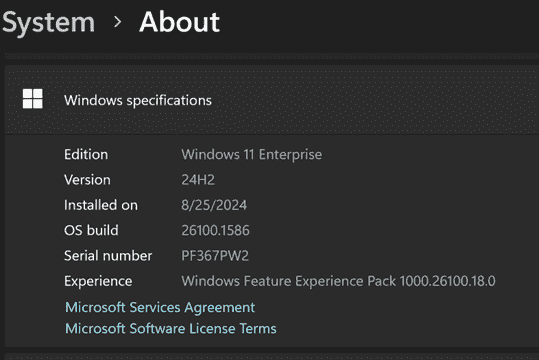
You can use the Windows 11 2024 Update (AKA version 24H2), the third and new major update to Windows 11, as this is the first Windows version to have development support for OpenHCL VMs.
As of October 1, 2024, the Windows 11 2024 Update is available. Microsoft is taking a phased approach with its rollout. If the update is available for your device, it will download and install automatically.
Otherwise, you can get it via Windows Insider by registering with your Microsoft account and following these instructions (you can choose the “Release Preview Channel”). You may have to click the Check for updates button to download the latest Insider Preview build twice, and this update may take over an hour. Finally go to Settings > About to check you are on Windows 11, version 24H2 (Build 26100.1586).
Windows Server
Instructions coming soon.
Machine setup
Enable Hyper-V
Enbable Hyper-V on your machine.
Enable loading from developer file
Once you get the right Windows Version, run the following command once before starting your VM. Note that this enabled loading unsigned images, and must be done as administrator.
`Set-ItemProperty "HKLM:/Software/Microsoft/Windows NT/CurrentVersion/Virtualization" -Name "AllowFirmwareLoadFromFile" -Value 1 -Type DWORD | Out-Null`
File access
Ensure that your OpenHCL .bin is located somewhere that vmwp.exe in your Windows host has permissions to read it (that can be in windows\system32, or another directory with wide read access).
Create a VM
Save the path of the OpenHCL .bin in a var named $Path and save the VM name you want to use in a var named $VmName.
For example:
$Path = 'C:\Windows\System32\openhcl-x64.bin'
$VmName = 'myFirstVM'
Create VM as a Trusted Launch VM
Enables Trusted Launch for the VM.
You can use this script with no additional instructions required (simplest path).
$vm = new-vm $VmName -generation 2 -GuestStateIsolationType TrustedLaunch
.\openhcl\Set-OpenHCL-HyperV-VM.ps1 -VM $vm -Path $Path
Create other VM types
Instructions coming soon.
Set up guest OS VHD
Running a VM will be more useful if you have a guest OS image. Given that OpenHCL is a compatibility layer, the goal is to support the same set of guest OS images that Hyper-V currently supports without a paravisor.
You can pick any existing image that you have or download one from the web, such as from Ubuntu, or any other distro that is currently supported in Hyper-V.
`Add-VMHardDiskDrive -VMName $VmName -Path "<VHDX path>"-ControllerType SCSI -ControllerNumber 0 -ControllerLocation 1`
Windows - OpenVMM
OpenVMM currently has basic support for running with OpenHCL when run on Windows with WHP, with some caveats:
- Performance is not great due to the extra overhead of OpenVMM modeling VTLs, not the hypervisor.
- Not all hypercalls are implemented, only the set used by OpenHCL.
- Not all OpenHCL configuration and runtime management APIs are exposed / wired-up.
These are all caveats that can (and will) be overcome with additional investments into OpenVMM.
That said: running OpenHCL on OpenVMM is currently considered to be a dev-only workflow, not suitable for production use.
To get a more complete and accurate experience of what OpenHCL's production runtime characteristics and user ergonomics are like, we currently suggest running OpenHCL on Hyper-V.
Examples
These examples all use
cargo run --, with the assumption that you are a developer building your own copy of OpenVMM locally!To run these examples using a pre-compiled copy of OpenVMM, swap
cargo run --with/path/to/openvmm.Moreover - these examples assume basic familiarity with the OpenVMM command line, and willingness to deal with OpenVMM's various "rough edges" (as described in Getting Started: OpenVMM).
If you run into any issues, please refer to OpenVMM: Troubleshooting, and/or OpenHCL: Troubleshooting.
Preface: Using ohcldiag-dev
Add support for ohcldiag-dev by specifying the --vtl2-vsock-path option at vm
launch. This will create a Unix socket that the ohcldiag-dev binary can connect to by
specifying the path to the unix socket. By default, the socket is created in the
temp directory with path ohcldiag-dev. For example, running via powershell:
cargo run -p ohcldiag-dev -- $env:temp\ohcldiag-dev kmsg
Linux direct
Linux direct will work with an interactive console available via COM ports hosted in VTL2, relayed over VMBUS like on Hyper-V. Build a Linux direct IGVM file and launch with the following command line to enable COM0 and COM1 for VTL0:
cargo run -- --hv --vtl2 --igvm openhcl-x64.bin --com3 term -m 2GB --vmbus-com1-serial term --vmbus-com2-serial term --vtl2-vsock-path $env:temp\ohcldiag-dev
This will launch OpenVMM in VTL2 mode using Windows Terminal to display the
output of the serial ports. You can use term=<path to exe> to use your
favorite shell and by default OpenVMM will use cmd.exe. A vsock window can be
opened using the OpenVMM terminal on windows using v 9980 or whichever hvsock
port is configured to allow consoles for OpenHCL.
Vtl2 VMBus Support
OpenHCL run under OpenVMM can act as the VMBus server to VTL0. Additionally, OpenHCL can be configured to forward offers made by OpenVMM to VTL0.
To run OpenVMM and OpenHCL with VMBus host relay support:
--vmbus-redirect
Assigning MANA devices to VTL2
OpenHCL can be assigned a MANA NIC to VTL2, and expose a VMBus NIC to the guest in VTL0. Expose it by adding the following:
--net uh:consomme --vmbus-redirect
Assigning SCSI devices to VTL2
You can assign a SCSI disk to VTL2 and have OpenHCL reassign it to VTL0:
--disk file:ubuntu.img,uh --vmbus-redirect
Assigning NVME devices to VTL2
You can assign an NVME disk to VTL2 and have OpenHCL relay it to VTL0 as a VMBus scsi device:
--disk mem:1G,uh-nvme --vmbus-redirect
Linux
Currently, OpenHCL cannot be used on Linux hosts, primarily due to limitations in KVM (or our imagination). We would love to improve this, and we would accept contributions that get this working.
Technical Details
The main challenge is that OpenHCL needs to run in an environment where it can trap and emulate privileged instructions from the guest OS. It also benefits from the host being able to target interrupts directly into the guest OS, without relaying them through OpenHCL.
On Windows, this is achieved via Hyper-V's VTL support, even when leveraging isolation technologies like SNP and TDX. As of writing this, KVM does not yet support the required primitives for this.
Here are some approaches we can take to close the gap:
-
Use KVM's nested virtualization support. Launch an ordinary VM to run OpenHCL, modified to launch the guest OS in a nested VM. This won't be as fast as OpenHCL in Hyper-V, but it will allow a simple development environment on existing Linux kernels.
-
Extend KVM to support Hyper-V-style VTLs, to reach parity with Hyper-V, even in non-confidential VMs.
-
Extend KVM to fully support multiple VMPLs on SNP machines, and update OpenHCL to support using architectural GHCB calls to switch VMPLs, rather than Hyper-V-specific hypercalls.
-
Update OpenHCL to support TDX without Hyper-V-specific hypercalls. Optionally, extend KVM to model TDX L2s as VTLs so that the host can target interrupts to the guest directly.
Additionally, OpenHCL currently relies on Hyper-V communication devices for guest configuration and runtime services. This ties OpenHCL to the OpenVMM or Hyper-V VMMs. We are looking for ways to support alternatives for use with other VMMs such as qemu.
If you are interested in helping with any of this, please let us know.
OpenHCL Troubleshooting
This page includes a miscellaneous collection of troubleshooting tips for common issues you may encounter when running OpenHCL.
If you are still running into issues, consider filing an issue on the OpenVMM GitHub Issue tracker.
[Hyper-V] Vtl2/Vtl0 failed to start
VTL2/VTL0 fails to boot is when either VTL2 or VTL0 has crashed. When the crash happens, they will emit an event to the Hyper-V worker channel.
First, check Hyper-V worker events at Applications and Services Logs -> Microsoft -> Windows -> Hyper-V-Worker-Admin
Alternatively, some queries you can use to get Hyper-V-Worker logs:
- Display the
{n}most recent events -wevtutil qe Microsoft-Windows-Hyper-V-Worker-Admin /c:{n} /rd:true /f:text - Export events to file -
wevtutil epl Microsoft-Windows-Hyper-V-Worker-Admin C:\vtl2_0_crash.evtx
Next Steps
To learn more about how OpenHCL works, and how to interact with it:
| Reference: OpenHCL Features | Configure and interact with OpenHCL |
| Dev Guide: Building OpenHCL | Build OpenHCL locally |
| Reference: OpenHCL Architecture | Understand how OpenHCL works "under the hood" |
Getting Started (for Developers)
This chapter discusses all the basic steps required to begin building code in the OpenVMM project.
By the end of this chapter, you will have:
- Cloned the OpenVMM git repo
- Installed all required pre-build dependencies (e.g: Rust)
- Built local copies of both OpenVMM and OpenHCL
- (optionally) Set up a suggested VSCode-based development environment
Aside: What is HvLite? Underhill?
As you explore the OpenVMM repo, you may find references to things called HvLite and Underhill.
Simply put:
- OpenVMM is synonymous with HvLite
- OpenHCL is synonymous with Underhill
HvLite and Underhill were former Microsoft-internal codenames for OpenVMM and OpenHCL.
Migrating all existing code and documentation away from these codewords is not an overnight process, and it's quite likely these terms will linger in various code comments, variable names, library names, etc... the forseeable future.
Getting started on Linux / WSL2
This page provides instructions for installing the necessary dependencies to build OpenVMM or OpenHCL on Linux / WSL2.
[WSL2] Installing WSL2
To install Windows Subsystem for Linux, run the following command in an elevated Powershell window:
PS> wsl --install
This should install WSL2 using the default Ubuntu linux distribution. You can check that the installation completed successfully by running the following command in a Powershell window.
PS> wsl -l -v
  NAME            STATE           VERSION
* Ubuntu          Running         2
Once that command has completed, you will need to open WSL to complete the
installation and set your password. You can open WSL by typing wsl or bash
into Command Prompt or Powershell, or by opening the "Ubuntu" Windows Terminal
profile that should have been created.
If you intend to cross-compile OpenVMM for Windows, please ensure you are running a recent version of Windows 11. Windows 10 is no longer supported as a development platform, due to needed WHP APIs.
All subsequent commands on this page must be run within WSL2.
Installing Rust
To build OpenVMM or OpenHCL, you first need to install Rust.
The OpenVMM project actively tracks the latest stable release of Rust, though it may take a week or two after a new stable is released until OpenVMM switches over to it.
Please follow the official instructions to do so.
Cloning the OpenVMM source
If using WSL2: Do NOT clone the repo into Windows then try to access said clone from Linux. It will result in serious performance issues.
$ cd path/to/where/you/clone/repos
$ git clone https://github.com/microsoft/openvmm.git
Next Steps
You are now ready to build OpenVMM or OpenHCL!
Getting started on Windows
This page provides instructions for installing the necessary dependencies to build OpenVMM on Windows.
We strongly suggest using WSL2 for OpenVMM development, rather than developing on Windows directly. Developing in WSL2 offers a smoother development experience, while still allowing you to build and run OpenVMM on Windows through the use of cross compilation.
Additionally, it allows you to have a single clone of the OpenVMM repo suitable for both OpenVMM and OpenHCL development.
You must be running a recent version of Windows 11. Windows 10 is no longer supported as a development platform, due to needed WHP APIs.
NOTE: OpenHCL does NOT build on Windows.
If you are interested in building OpenHCL, please follow the getting started guide for Linux / WSL2.
Installing Rust
To build OpenVMM, you first need to install Rust.
The OpenVMM project actively tracks the latest stable release of Rust, though it may take a week or two after a new stable is released until OpenVMM switches over to it.
Please follow the official instructions to do so.
If you don't already have it, you will need to install Visual Studio C++ Build tools or Visual Studio with the component "Desktop Development for C++".
This can be installed via Visual Studio Installer -> Modify -> Individual Components
-> MSVC v143 - VS 2022 C++ x64/x86 build tools (latest).
Or, you can install the tool via the powershell command below.
PS> winget install Microsoft.VisualStudio.2022.Community --override "--quiet --add Microsoft.VisualStudio.Component.VC.Tools.x86.x64"
Aarch64 support
To build ARM64, you need an additional dependency.
This can be installed via Visual Studio Installer -> Modify -> Individual Components
-> MSVC v143 - VS 2022 C++ ARM64/ARM64EC build tools (latest).
Or, you can install the tool via the powershell command below.
PS> winget install Microsoft.VisualStudio.2022.Community --override "--quiet --add Microsoft.VisualStudio.Component.VC.Tools.ARM64"
Cloning the OpenVMM source
If you haven't already installed git, you can download it
here.
PS> git clone https://github.com/microsoft/openvmm.git
Next Steps
You are now ready to build OpenVMM!
Building OpenVMM
Prerequisites:
It is strongly suggested that you use WSL2, and cross compile for Windows when necessary.
Build Dependencies
OpenVMM currently requires a handful of external dependencies to be present in
order to properly build / run. e.g: a copy of protoc to compile Protobuf
files, a copy of the mu_msvm UEFI firmware, some test linux kernels, etc...
Running the following command will fetch and unpack these various artifacts into the correct locations within the repo:
cargo xflowey restore-packages
If you intend to cross-compile, refer to the command's --help for additional
options related to downloading packages for other architectures.
[Linux] Additional Dependencies
On Linux, there are various other dependencies you will need depending on what you're working on. On Debian-based distros such as Ubuntu, running the following command within WSL will install these dependencies.
In the future, it is likely that this step will be folded into the
cargo xflowey restore-packages command.
$ sudo apt install \
  binutils              \
  build-essential       \
  gcc-aarch64-linux-gnu \
  libssl-dev
Building
OpenVMM uses the standard Rust build system, cargo.
To build OpenVMM, simply run:
cargo build
Note that certain features may require compiling with additional --feature
flags.
Troubleshooting
This section documents some common errors you may encounter while building OpenVMM.
If you are still running into issues, consider filing an issue on the OpenVMM GitHub Issue tracker.
failed to invoke protoc
Error:
error: failed to run custom build command for `inspect_proto v0.0.0 (/home/daprilik/src/openvmm/support/inspect_proto)`

Caused by:
  process didn't exit successfully: `/home/daprilik/src/openvmm/target/debug/build/inspect_proto-e959f9d63c672ccc/build-script-build` (exit status: 101)
  --- stderr
  thread 'main' panicked at support/inspect_proto/build.rs:23:10:
  called `Result::unwrap()` on an `Err` value: Custom { kind: NotFound, error: "failed to invoke protoc (hint: https://docs.rs/prost-build/#sourcing-protoc): (path: \"/home/daprilik/src/openvmm/.packages/Google.Protobuf.Tools/tools/protoc\"): No such file or directory (os error 2)" }
  note: run with `RUST_BACKTRACE=1` environment variable to display a backtrace
warning: build failed, waiting for other jobs to finish...
Note: the specific package that throws this error may vary, and may not always be inspect_proto
Solution:
You attempted to build OpenVMM without first restoring necessary packages.
Please run cargo xflowey restore-packages, and try again.
Building OpenHCL
Prerequisites:
Reminder: OpenHCL cannot currently be built on Windows hosts!
An OpenHCL IGVM firmware image is composed of several distinct binaries and
artifacts. For example: the openvmm_hcl usermode binary, the OpenHCL boot
shim, the OpenHCL Linux kernel and initrd, etc....
Some of these components are built directly out of the OpenVMM repo, whereas others must be downloaded as pre-built artifacts from other associated repos. Various tools and scripts will then transform, package, and re-package these artifacts into a final OpenHCL IGVM firmware binary.
Fortunately, we don't expect you do to all those steps manually!
All the complexity of installing the correct system dependencies, building the
right binaries, downloading the right artifacts, etc... is neatly encapsulated
behind a single cargo xflowey build-igvm command, which orchestrates the
entire end-to-end OpenHCL build process.
NOTE:
cargo xflowey build-igvmis designed to be used as part of the developer inner-loop, and does NOT have a stable CLI suitable for CI or any other form of production automation!In-tree pipelines and automation should interface with the underlying
floweyinfrastructure that powerscargo xflowey build-igvm, without relying on the details of its CLI.
Using the build-igvm flow is as simple as running:
cargo xflowey build-igvm [RECIPE]
The first build will take some time as all the dependencies are installed/downloaded/built.
Note: At this time, OpenHCL can only be built on Linux (or WSL2)!
A "recipe" corresponds to one of the pre-defined IGVM SKUs that are actively supported and tested in OpenVMM's build infrastructure.
A single recipe encodes all the details of what goes into an individual IGVM
file, such as what build flags openvmm_hcl should be built with, what goes
into a VTL2 initrd, what igvmfilegen manifest is being used, etc...
- e.g:
x64, for a "standard" x64 IGVM - e.g:
aarch64, for a "standard" aarch64 IGVM - e.g:
x64-cvm, for a x64 CVM IGVM - e.g:
x64-test-linux-direct, for x64 IGVM booting a test linux direct image - for a full list of available recipes, please run
cargo xflowey build-igvm --help
New recipes can be added by modifying the build-igvm source code.
Build output is then binplaced to: flowey-out/artifacts/build-igvm/{release-mode}/{recipe}/openhcl-{recipe}.bin
So, for example:
cargo xflowey build-igvm x64-cvm
# output: flowey-out/artifacts/build-igvm/debug/x64-cvm/openhcl-x64-cvm.bin

cargo xflowey build-igvm x64 --release
# output: flowey-out/artifacts/build-igvm/release/x64/openhcl-x64.bin
Building ohcldiag-dev
ohcldiag-dev is typically built as a Windows binary.
This can be done directly from Windows, or using cross-compilation from WSL2, as described in the Suggested Dev Environment section of the Guide.
The command to build ohcldiag-dev is simply:
# you may need to run `rustup target add x86_64-pc-windows-msvc` first
cargo build -p ohcldiag-dev --target x86_64-pc-windows-msvc
Note: Thanks to x86 emulation built into Windows, ohcldiag-dev.exe that is
built for x64 Windows will work on Aarch64 Windows as well.
Troubleshooting
This section documents some common errors you may encounter while building OpenHCL.
If you are still running into issues, consider filing an issue on the OpenVMM GitHub Issue tracker.
Help! The build failed due to a missing dependency!
If you don't mind having xflowey install some dependencies globally on your
machine (i.e: via apt install, or rustup toolchain add), you can pass
--auto-install-deps to your invocation of build-igvm.
Alternatively - build-igvm should emit useful human-readable error messages
when it encounters a dependency that isn't installed, with a suggestion on how
to install it.
If it doesn't - please file an Issue!
Help! Everything is rebuilding even though I only made a small change!
Cargo's target triple handling can be a bit buggy. Try running with:
CARGO_BUILD_TARGET=x86_64-unknown-linux-gnu cargo build-igvm [RECIPE]
or adding the below to your .bashrc:
export CARGO_BUILD_TARGET=x86_64-unknown-linux-gnu
Build Customization
Aside from building IGVM files corresponding the the built-in IGVM recipes,
build-igvm also offers a plethora of customization options for developers who
wish to build specialized custom IGVM files for local testing.
Some examples of potentially useful customization include:
-
--override-manifest: Override the recipe'sigvmfilegenmanifest file via, in order to tweak different kernel command line options, different VTL0 boot configuration, or different VTL2 memory sizes. -
--custom-openvmm-hcl: Specify a pre-builtopenvmm_hclbinary. This is useful in case you have already built it with some custom settings, e.g.:cargo build --target x86_64-unknown-linux-musl -p openvmm_hcl --features myfeature cargo xflowey build-igvm x64 --custom-openvmm-hcl target/x86_64-unknown-linux-musl/debug/openvmm_hcl -
Specify a custom VTL2 kernel
vmlinux/Image, instead of using a pre-packed stable/dev kernel.cargo xflowey build-igvm x64 --custom-kernel path/to/my/prebuilt/vmlinux
For a full list of available customizations, refer to build-igvm --help.
Advanced
Depending on what you're doing, you may need to build the individual components that go into an OpenHCL IGVM build.
Our flowey-based pipelines handle the complexities of properly invoking and
orchestrating the various individual build tools / scripts used to construct
IGVM files, but a sufficiently motivated user can go through these steps
manually.
Please consult the source code for cargo xflowey build-igvm for a breakdown of
all build steps and available customization options.
Note that the canonical "source of truth" for how to build end-to-end OpenHCL IGVM files are these build scripts themselves, and the specific flow is subject to change over time!
Building a custom OpenHCL Linux Kernel
This step is NOT required in order to build OpenHCL!
Unless you have a specific reason, it is strongly recommended to stick to the pre-built Kernel image which is automatically downloaded as part of the OpenHCL build process.
Cloning the kernel repository
If you need to rebuild the kernel, the sources are available in the OHCL-Linux-Kernel repo :
- the main branch is product/hcl-main/6.6,
- the dev branch is project/hcl-dev/6.6.
Unless you need the entire repo history, cloning just one branch and depth = 1, saves
significant time and disk space:
git clone https://github.com/microsoft/OHCL-Linux-Kernel.git -b product/hcl-main/6.6 --depth=1
Cloning under Windows is likely to fail due to some files using names that Windows reserves, e.g. aux.c, and
NTFS being non case-sensitive by default as there are few files in the Linux kernel repo whose names differ
in their case only. To clone successfully under Windows, need a fix in ntdll (merged in Ni?),
and a case-sensitive NTFS partition. Best to start with the default WSL2 if there is no existing working setup.
Building the kernel locally
The following instructions for building the kernel locally target the Ubuntu distributions.
In order to build on rpm-based systems the only changes are likely to be the way the package
manager is invoked and installing the kernel-devel package instead of what is needed for
Ubuntu.
The paths below are relative to the cloned kernel repository root.
Do once for every machine that hasn't run this step successfully:
./Microsoft/install-deps.sh
Every time the kernel needs to be rebuilt:
./Microsoft/build-hcl-kernel.sh
The output directory is ./out, it contains the kernel binary, the kernel modules,
and the debug symbols, and cargo xflowey build-igvm can be pointed to it to use
as a source of the kernel binary and the modules.
In the case you are iterating on a change, install ccache
for decreasing the kernel build time significantly, might be close to an order of
magnitude. To use the compiler cache, prepend CC="ccache gcc" to the build command.
To see if the cache integrates itself into the toolchain:
host:~$ which gcc

/usr/lib64/ccache/gcc
Suggested Dev Environment
Prerequisites:
- One of:
- One of:
This page is for those interested in actively iterating on OpenVMM or OpenHCL.
Setting up VSCode
These instructions assume you're using VSCode.
If you're using a different development environment, we nonetheless suggest reading through this section, so you can enable similar settings in whatever editor / IDE you happen to be using.
[WSL2] Connecting to WSL using VSCode
When using Visual Studio Code with WSL, be sure to use the
WSL extension
instead of accessing your files using the \\wsl.localhost share (the repo
should be cloned in the WSL filesystem, as mentioned in the WSL getting started
guide). This will ensure that all VSCode extensions and features to work properly.
Once the extension is installed, click the blue arrows in the bottom left corner and select "Connect to WSL". Then open the folder you cloned the repository into. More information is available here.
Configuring rust-analyzer
rust-analyzer provides IDE-like functionality when writing Rust code (e.g: autocomplete, jump to definition, refactoring, etc...). It is a massive productivity multiplier when working with Rust code, and it would be a very bad idea to work in the OpenVMM repo without having it set up correctly.
Check out the rust-analyzer manual for a comprehensive overview of rust-analyzer's features.
Once installed, we suggest you specify the following additional configuration
options in the OpenVMM workspace's .vscode/settings.json file:
{
    "rust-analyzer.linkedProjects": [
        "Cargo.toml",
    ]
}
(Strongly Suggested) Avoiding cache invalidation
To avoid unnecessary re-builds or lock-contention in the build directory between rust-analyzer and manual builds, set the following configuration option to give rust-analyzer a separate target directory:
{
    "rust-analyzer.cargo.targetDir": true,
}
(Strongly Suggested) Disable nested imports
When auto-importing deps, rust-analyzer defaults to nesting imports, which isn't the OpenVMM convention.
This can be changed to one-dep-per-line by specifying the following settings:
{
    "rust-analyzer.imports.granularity.group": "item",
    "rust-analyzer.imports.group.enable": false,
}
Enabling clippy
CI will fail if the code is not clippy-clean. Clippy is a linter that helps catch common mistakes and improves the quality of our Rust code.
By default, rust-analyzer will use cargo check to lint code, but it can be
configured to use cargo clippy instead:
{
  "rust-analyzer.check.command": "clippy",
}
Enabling Format on Save
CI will fail if code is not formatted with rustfmt.
You can enable the "format on save" option in VSCode to automatically run
rustfmt whenever you save a file:
{
    "[rust]": {
        "editor.formatOnSave": true
    },
}
Enhanced "Enter"
rust-analyzer can override the "Enter" key to make it smarter:
- "Enter" inside triple-slash comments automatically inserts
/// - "Enter" in the middle or after a trailing space in
//inserts// - "Enter" inside
//!doc comments automatically inserts//! - "Enter" after
{indents contents and closing}of single-line block
This action needs to be assigned to shortcut explicitly, which can be done by
adding the following line to keybindings.json:
// must be put into keybindings.json, NOT .vscode/settings.json!
{
    "key": "Enter",
    "command": "rust-analyzer.onEnter",
    "when": "editorTextFocus && !suggestWidgetVisible && editorLangId == rust"
}
Running cargo xtask fmt house-rules on-save
The OpenVMM project includes a handful of custom "house rule" lints that are
external to rustfmt. These are things like checking for the presence of
copyright headers, enforcing single-trailing newlines, etc...
These lints are enfoced using cargo xtask fmt house-rules, and can be
automatically fixed by passing the --fix flag.
We recommend installing the RunOnSave extension, and configuring it to run these lints as part of your regular development flow.
Set the following configuration in your .vscode/settings.json
{
    "emeraldwalk.runonsave": {
        "commands": [
            {
                "match": ".*",
                "cmd": "cd ${workspaceFolder}"
            },
            {
                "match": ".*",
                "isAsync": true,
                "cmd": "$(cat ./target/xtask-path) fmt house-rules --fix ${file}"
            }
        ]
    },
}
GitHub Pull Request Integration
As the repo is hosted on GitHub, you might find convenient to use the GitHub Pull Request VSCode extension. That allows working through the PR feedback and issues without leaving the comfort of VSCode.
Setting up pre-commit and pre-push hooks
It's never fun having CI reject your changes due to some minor formatting issue,
especially when it's super quick to run those formatting checks locally. Running
cargo xtask fmt before pushing up your code is quick and easy, and will save
you the annoyance of wrestling with formatting check-in gates!
Of course, it's very easy to forget to run cargo xtask fmt after making code
changes, but thankfully, you can set up some git hooks
that will do this for you automatically!
You can run cargo xtask install-git-hooks --help for more details on what
hooks are available and their various configuration options, but for most users,
we suggest the following config:
cargo xtask install-git-hooks --pre-push --with-fmt=yes
And you'll be all set!
NOTE: If you're worried about time, the
pre-pushhook should only takes ~5 seconds to run locally. That's far better than sinking ~20+ mins of CI time!
[WSL2] Cross Compiling from WSL2 to Windows
Setting up cross compilation is very useful, as it allows using the same repo cloned in WSL2 to both develop OpenHCL, as well as launch it via OpenVMM via the WHP backend.
Required Dependencies
Note that this requires some additional dependencies, described below.
Windows deps
Visual Studio build tools must be installed, along with the Windows SDK. This is the same as what's required to build OpenVMM on windows.
WSL deps
The msvc target x86_64-pc-windows-msvc must be installed for the toolchain
being used in WSL. This can be added by doing the following:
rustup target add x86_64-pc-windows-msvc
Note that today this is only supported with the external, public toolchain, not msrustup.
Additional build tools must be installed as well. If your distro has LLVM 14 available (Ubuntu 22.04 or newer):
sudo apt install clang-tools-14 lld-14
Otherwise, follow the steps at https://apt.llvm.org/ to install a specific
version, by adding the correct apt repos. Note that you must install
clang-tools-14 as default clang-14 uses gcc style arguments, where
clang-cl-14 uses msvc style arguments. You can use their helper script as
well:
wget https://apt.llvm.org/llvm.sh
chmod +x llvm.sh
sudo ./llvm.sh 14
sudo apt install clang-tools-14
Setting up the terminal environment
Source the build_support/setup_windows_cross.sh script from your terminal
instance. For example, the following script will do this along with setting a
default cargo build target:
#!/bin/bash

# Setup environment and windows cross tooling.

export CARGO_BUILD_TARGET=x86_64-unknown-linux-gnu
cd path/to/openvmm || exit
. build_support/setup_windows_cross.sh
exec "$SHELL"
For developers using shells other than bash, you may need to run the
setup_windows_cross.sh script in bash then launch your shell in order to get
the correct environment variables.
Editing with vscode
You can have rust-analyzer target Windows, which will allow you to use the same
repo for OpenHCL, Linux, and Windows changes, but the vscode remote server
must be launched from the terminal window that sourced the setup script. You can
do this by closing all vscode windows then opening your workspace with
code <path to workspace> in your terminal.
Add the following to your workspace settings for a vscode workspace dedicated to Windows:
"settings": {
    "rust-analyzer.cargo.target": "x86_64-pc-windows-msvc"
}
Running Windows OpenVMM from within WSL
You can build and run the windows version of OpenVMM by overriding the target
field of cargo commands, via --target x86_64-pc-windows-msvc. For example, the
following command will run OpenVMM with WHP:
cargo run --target x86_64-pc-windows-msvc
You can optionally set cargo aliases for this so that you don't have to type out
the full target every time. Add the following to your ~/.cargo/config.toml:
[alias]
winbuild = "build --target x86_64-pc-windows-msvc"
wincheck = "check --target x86_64-pc-windows-msvc"
winclippy = "clippy --target x86_64-pc-windows-msvc"
windoc = "doc --target x86_64-pc-windows-msvc"
winrun = "run --target x86_64-pc-windows-msvc"
wintest = "test --target x86_64-pc-windows-msvc"
You can then run the windows version of OpenVMM by running:
cargo winrun
Speeding up Windows OpenVMM launch
Due to filesystem limitations on WSL, launching OpenVMM directly will be somewhat slow. Instead, you can copy the built binaries to a location on in the Windows filesystem and then launch them via WSL.
Quite a few folks working on the OpenVMM project have hacked together personal helper scripts to automate this process.
TODO: include a sample of such a script here
Testing
This chapter discusses the various kinds of tests you will encounter as an OpenVMM developer.
Unit Tests
Note: We recommend using cargo-nextest to run unit / VMM tests. It is a significant improvement over the built-in
cargo testrunner, and is the test runner we use in all our CI pipelines.You can install it locally by running:
cargo install cargo-nextest --lockedSee the cargo-nextest documentation for more info.
Unit tests test individual functions or components without pulling in lots of ambient infrastructure. In Rust, these are usually written in the same file as the product code--this ensures that the test has access to any internal methods or state it requires, and it makes it easier to ensure that tests and code are updated at the same time.
A typical module with unit tests might look something like this:
#![allow(unused)]
fn main() {
fn add_5(n: u32) -> u32 {
    n + 5
}

#[cfg(test)]
mod tests {
    #[test]
    fn test_add_5() {
        assert_eq!(add_5(3), 8);
    }
}
}
In the OpenVMM repo, all the unit tests are run on every pull request, on an arbitrary build machine. As a result of this approach, it's important that unit tests:
- run quickly
- do not affect the state of the machine that runs them
- do not take a dependency on machine configuration
- e.g: no root/administrator access or virtualization requirement
We may loosen these guidelines over time if it becomes necessary. You can also
mark tests with #[ignore] if they do not meet these guidelines but are useful
for manual testing.
See the unit testing section in "Rust by example" for more details.
Doc tests
Rust has another type of unit tests known as doc tests. These are unit tests that are written in the API documentation comments of public functions. They will be run automatically along with the unit tests, so the same guidelines apply.
When do you choose a doc test over a unit test?
Doc tests can only access public functionality, and they are intended to document the usage of a function or method, not to exhaustively check every case. So write doc tests primarily as examples for other developers, and rely on unit tests for your main coverage.
An example might look like this:
#![allow(unused)]
fn main() {
/// Adds 5 to `n`.
///
/// ```
/// assert_eq!(mycrate::add_5(3), 8);
/// ```
pub fn add_5(n: u32) -> u32 {
    n + 5
}
}
See the documentation testing section in Rust by example for more info.
VMM Tests
Note: We recommend using cargo-nextest to run unit / VMM tests. It is a significant improvement over the built-in
cargo testrunner, and is the test runner we use in all our CI pipelines.You can install it locally by running:
cargo install cargo-nextest --lockedSee the cargo-nextest documentation for more info.
The OpenVMM repo contains a set of "heavyweight" VMM tests that fully boot a
virtual machine and run validation against it. Unlike Unit tests, these are all
centralized in a single top-level vmm_tests directory.
Running VMM Tests
VMM tests are run using standard Rust test infrastructure, and are invoked via
cargo test / cargo nextest.
cargo nextest run vmm_tests [TEST_FILTERS]
For example, to run a simple VMM test that simply boots using UEFI:
cargo nextest run -p vmm_tests x86_64::uefi_x64_frontpage
[Linux] Cross-compiling pipette.exe
These commands might use the test agent (pipette) that is put inside the VM,
and if the host machine OS and the guest machine OS are different, a setup
is required for cross-building. The recommended approach is to use WSL2 and
cross-compile using the freely available Microsoft Visual Studio Build Tools
or Microsoft Visual Studio Community Edition as described in
([WSL2] Cross Compiling from WSL2 to Windows)[../getting_started/suggested_dev_env.md#wsl2-cross-compiling-from-wsl2-to-windows]
If that is not possible, here is another option that relies on MinGW-w64 and doesn't require installing Windows:
# Do 1 once, do 2 as needed.
#
# 1. Setup the toolchain
rustup target add x86_64-pc-windows-gnu
sudo apt-get install mingw-w64-x86-64-dev
mingw-genlib -a x86_64 ./support/pal/api-ms-win-security-base-private-l1-1-1.def
sudo mv libapi-ms-win-security-base-private-l1-1-1.a /usr/x86_64-w64-mingw32/lib

# 2. Build Pipette (builds target/x86_64-pc-windows-gnu/debug/pipette.exe first)
cargo build --target x86_64-pc-windows-gnu -p pipette
# Run a test
cargo nextest run -p vmm_tests x86_64::uefi_x64_windows_datacenter_core_2022_x64_boot
Acquiring external dependencies
Unlike Unit Tests, VMM tests may rely on additional external artifacts in order to run. e.g: Virtual Disk Images, pre-built OpenHCL binaries, UEFI / PCAT firmware blobs, etc...
As such, the first step in running a VMM test is to ensure you have acquired all external test artifacts it may depend upon.
At this time, the VMM test infrastructure does not automatically fetch / rebuild necessary artifacts. That said - test infrastructure is designed to report clear and actionable error messages whenever a required test artifact cannot be found, which provide detailed instructions on how to build / acquire the missing artifact.
Printing logs for VMM Tests
In order to see the OpenVMM logs while running a VMM test, do the following:
- Add the
--no-captureflag to yourcargo nextestcommand. - Set
OPENVMM_LOG=trace, replacingtracewith the log level you want to view.
Writing VMM Tests
To streamline the process of booting and interacting VMs during VMM tests, the
OpenVMM project uses a in-house test framework/library called petri.
The library does not yet have a stable API, so at this time, the best way to
learn how to write new VMM tests is by reading through the existing corpus of
tests, as well as reading through petri's rustdoc-generated API docs.
Azure-hosted Test Images
OpenVMM utilizes pre-made VHDs in order to run tests with multiple guest operating systems. These images are as close to a "stock" installation as possible, created from the Azure Marketplace or downloaded directly from a trusted upstream source.
These VHDs are stored in Azure Blob Storage, and are downloaded when running VMM tests in CI.
Unfortunately, due to licensing issues, these images are not available for public download.
To run VMM tests utilizing these images outside of Microsoft, you may need to procure and prepare similar test images yourself. At this time, we do not have explicit documentation on how to do so.
Downloading VHDs (Microsoft only)
The following instructions are for Microsoft employees only.
The cargo xtask guest-test download-image command can be used to download vhds
to your machine.
By default it will download all available VHDs, however the --vhd option can
be used to only download select guests. After running it the tests can be run
just like any other. This command requires having
AzCopy
installed.
Note that at the time of writing the newest version of AzCopy (10.26.0) is unable to correctly authenticate while running under WSL. To work around this an older version can be used. The linux build of version 10.21.2, which is known to work, can be downloaded from here.
Fuzzing in OpenVMM
Fuzzing infrastructure in OpenVMM is based on the excellent cargo-fuzz project, which makes it super easy to get up-and-running with fuzzing in Rust projects.
For the curious: Under-the-hood, cargo-fuzz hooks into LLVM's
libFuzzer to do the actual fuzzing.
Running Fuzzers Locally
Installing Dependencies
To begin fuzzing in OpenVMM, you'll need to install cargo-fuzz and a nightly
rust compiler.
Installation should be as simple as:
rustup install nightly
cargo install cargo-fuzz
NOTE:
cargo-fuzzrequires a nightly toolchain as it compiles targets with ASAN to improve the likelihood of finding bugs and the reproducibility of testcases.
Running
While its entirely possible to run the various fuzzers in the OpenVMM repo using
cargo fuzz directly, the OpenVMM repo includes additional tooling to streamline
working with fuzzers at "OpenVMM scale": cargo xtask fuzz
cargo xtask fuzz bridges the gap between cargo fuzz's "crate-oriented"
tooling, and OpenVMM's "repo-oriented" tooling.
e.g: instead of manually navigating to each individual crate/fuzz directory in
order to use cargo fuzz, with cargo xtask fuzz, you can list/run/build any
fuzzer in the OpenVMM repo, regardless where it happens to be in the repo!
Before you can run a fuzzer, you need to know its name. To see a list of all fuzzers currently in the OpenVMM tree, you can run:
cargo xtask fuzz list
The output will be a list of available "fuzz targets":
$ cargo xtask fuzz list
fuzz_chipset_battery
fuzz_ide
fuzz_scsi_buffers
Once you've got a fuzzer you're interested in running (e.g: fuzz_ide),
starting a fuzzing session is as easy as running:
cargo xtask fuzz run fuzz_ide
And you're off! If you see a whole bunch of terminal spew, congrats, you're fuzzing!
When run locally using the above command, the fuzzer will run indefinitely until a crash is discovered.
If you need to tweak the runtime behavior of the command, all of libFuzzer's commandline options are at your disposal. Alternatively you can print the help of the fuzzer like so:
# NOTE: The "-- --" is required to differentiate between `xtask fuzz`'s
# extra-args, and `cargo fuzz`'s extra-args
cargo xtask fuzz run fuzz_ide -- -- -help=1
Other Fuzzing Commands
The cargo xtask fuzz CLI includes plenty of docs via --help text. Don't be
afraid to dig into all the tools available via cargo xtask fuzz by using
--help at both the top-level, and for more details regarding the various
subcommands.
Note that most cargo xtask fuzz commands mirror those from cargo fuzz, so
for additional information on how certain commands work, check out the
cargo-fuzz book.
Coverage
The effectiveness of fuzzing can be measured with code coverage.
Code coverage can be analyzed to determine which branches in the target were exercised and which were missed by the fuzzer. This can be used to determine if the fuzzer needs improvements or is doing an adequate job.
Before you begin you'll need some additional dependencies to generate an html report:
rustup +nightly component add llvm-tools
apt install lcov
To generate a report with "sane defaults", you can simply run:
cargo xtask fuzz coverage fuzz_ide --with-html-report
Simply navigate to the `html/report/dir/index.html`` on your machine and inspect the coverage!

NOTE:
--with-html-reportoffers a quick-and-easy way for an individual user generate a coverage report locally, but it may not be entirely appropriate for more "industrial scale" fuzzing pipelines.
Manual Coverage Generation (Advanced)
The basic way this is done is by running all the discovered input testcases
through the fuzzer and merging all the coverage events together (remember, the
fuzzers only save testcases which generate new coverage). Cargo-fuzz provides a
way to do this with the coverage subcommand. This step generates a
coverage.profdata file which can be turned into a human-readable HTML report:
# cargo xtask fuzz coverage <fuzzer name>
cargo xtask fuzz coverage fuzz_ide
# confirm coverage.profdata was created
ls -l coverage.profdata
OR if you have a large number of inputs (5k+) the below will collect and merge coverage significantly faster:
# rebuild the fuzzer with coverage instrumentation
RUSTFLAGS="-C instrument-coverage" cargo +nightly fuzz build
# set env var to rustup's llvm-preview tools
LLVM_TOOLS_PATH=$(dirname $(find $(rustc +nightly --print sysroot) -name 'llvm-profdata'))
# make an output directory for corups minimation
mkdir min_corp
# run the minimizer putting the raw cov data into coverage.profraw
LLVM_PROFILE_FILE="coverage.profraw" ./fuzz/targets/<target-path>/release/fuzz_ide min_corp <path to input corpus directory> -merge=1
# merge the raw data into coverage.profdata
$LLVM_TOOLS_PATH/llvm-profdata merge -sparse coverage.profraw -o coverage.profdata
Next find the location of the llvm-tools you installed with rustup (NOTE: rustup is used to install the LLVM tools to ensure that rust's llvm version and the tool version are in sync), and convert the coverage data into a report:
# set env var to rustup's llvm-preview tools
LLVM_TOOLS_PATH=$(dirname $(find $(rustc +nightly --print sysroot) -name 'llvm-profdata'))
# covert the coverage data into an lcov format
$LLVM_TOOLS_PATH/llvm-cov export -instr-profile=coverage.profdata \
    -format=lcov \
    -object ./fuzz/targets/<target-triple>/coverage/<target-triple>/release/fuzz_ide \
    --ignore-filename-regex "rustc" > coverage.lcov
# summarize the coverage information
lcov --summary ./coverage.lcov
# make an output directory for the html report
mkdir -p lcov_html
# generate the html report
genhtml -o lcov_html --legend --highlight ./coverage.lcov
Writing Fuzzers
Writing a new fuzzer in OpenVMM
The easiest way to get up and running is to look at the existing in-tree fuzzers
(which you can list using cargo xtask fuzz list), along with reading through
the cargo-fuzz book (the
book is fairly brief and shouldn't take more than 20 minutes to read through)
Some examples of in-tree fuzzers:
- Simple device example: chipset/fuzz/battery.rs
- More complex device example: ide/fuzz/fuzz_ide.rs
- Abstraction over unsafe example: ide/fuzz/fuzz_scsi_buffer.rs
Once you're ready to take a stab at writing your own fuzzer, spinning up a new fuzzer is as easy as running:
cargo xtask fuzz init openvmm_crate_to_fuzz TEMPLATE
Use --help for more details on the available TEMPLATE types.
NOTE: We don't suggest using
cargo fuzz init(i.e: withoutxtask), as it emits a template that isn't compatible with the OpenVMM repo style, and also doesn't properly update the root Cargo.toml'sworkspace.membersarray.
Fuzzing an abstraction over unsafe code
Unsafe code is a prioritized target for fuzzing given its self-evident risks.
However, it can be hard to reason about how best to exercise unsafe code in OpenVMM via fuzzing as often (and correctly) the unsafe code is not directly interacting with guest-controlled data.
The approach taken with OpenVMM then is to target abstractions over unsafe code.
Such as interfaces and data structures like BounceBuffers, guest_memory, or
ucs2. A fuzzer for one of these will attempt to be a regular consumer of the
abstraction, calling those APIs declared safe and using any data structure in a
rust-safe way. This attempts to check that the safety guarantees the abstraction
is making are being upheld via the API.
For example, let's say we want to fuzz BounceBuffers, here's what we may
want to fuzz:

Fuzz logic might then allocate a BounceBuffer using new and call methods on
it such as as_mut_bytes and io_vecs. Then it could access the return result
of both those calls:
#![allow(unused)]
fn main() {
use scsi_buffers::BounceBuffer;

#[derive(Arbitrary)]
enum BouneBufferAccess {
    AsMutBytes,
    IoVecs
}

#[derive(Arbitrary)]
struct FuzzCase {
    #[arbitrary(with = |u: &mut Unstructured| u.int_in_range(0..=0x40000))]
    size: usize,
    accesses: Vec<BounceBufferAccess>
}

fn access_mut_bytes(buf: &mut [u8]) {
    buf.fill(b'A');
    // access buf in other ways to test validity of underlying memory and slice
}

fn access_io_vecs(io_vecs: &[IoBuffer]) {
    // access each IoBuffer to test validity of ptr and len
}

fuzz_target!(|fuzz_case: FuzzCase| { do_fuzz(fuzz_case) });

fn do_fuzz(fuzz_case: FuzzCase) {
    let mut bb = BounceBuffer::new(fuzz_case.size);

    for access in fuzz_case.accesses {
        match access {
            AsMutBytes => {
                let buf = bb.as_mut_bytes();
                access_mut_bytes(buf);
            },
            IoVecs => {
                let io_vecs = bb.io_vecs();
                access_io_vecs(io_vecs)
            }
        }
    }
})
}
The fuzzer should work to ensure the safe members of the API cannot be misused in any way that may result in memory corruption or unsoundness.
Fuzzing a chipset device
Writing a fuzzer for a chipset device (e.g: battery, ide, serial, pic, etc...) involves targeting the API that is roughly exposed to guests: the device's port IO, PCI config, and MMIO interfaces.
While it's entirely possible to hand-roll a fuzzer that is tailored to the
specific register configuration of a particular device, the in-repo
chipset_device_fuzz crate exports a FuzzChipset type that offers a
"plug-and-play" way to hook a chipset device up to a fuzzer:
#![allow(unused)]
fn main() {
#[derive(Arbitrary)]
struct StaticDeviceConfig {
    #[arbitrary(with = |u: &mut Unstructured| u.int_in_range(0..=16))]
    num_queues: usize,
}

fn do_fuzz(u: &mut Unstructured<'_>) -> arbitrary::Result<()> {
    // Step 1: generate a device's fixed-at-construction-time configuration
    let static_device_config: StaticDeviceConfig = u.arbitrary()?;

    // Step 2: init the device, and wire-it-up to the fuzz chipset
    let mut chipset = chipset_device_fuzz::FuzzChipset::default();
    let my_device = chipset.device_builder("my_dev").add(|services| {
        my_dev::MyDevice::new(
            static_device_config.num_queues,
            &mut services.register_mmio(), // e.g: pci devices have BARs to remap their MMIO intercepts
        )
    }).unwrap();

    // Step 3: use the remaining fuzzing input to slam the device with chipset events
    while !u.is_empty() {
        let action = chipset.get_arbitrary_action(u)?;
        xtask_fuzz::fuzz_eprintln!("{:x?}", action); // only prints when running a repro
        chipset.exec_action(action).unwrap();

        // Step 3.5: (optionally) intersperse "external stimuli" between chipset actions
        if u.ratio(1, 10)? {
            let event: u32 = u.arbitrary()?;
            my_device.report_external_event(event);
        }
    }

    Ok(())
}

fuzz_target!(|input: &[u8]| -> libfuzzer_sys::Corpus {
    if do_fuzz(&mut Unstructured::new(input)).is_err() {
        libfuzzer_sys::Corpus::Reject
    } else {
        libfuzzer_sys::Corpus::Keep
    }
});
}
Fuzzing a vmbus device
TBD (no such fuzzers exist in-tree today)
Fuzzing async code
Depending on the nature of the 'async' code in question, there are two main recommended approaches to fuzzing it:
-
now_or_never: The recommended approach for individual asynchronous calls is to use the
now_or_nevermethod from thefuturescrate. This method will poll the future to completion, but will not block if the future is not ready to complete. This allows you to fuzz the future without needing to run it to completion, which can be useful for testing the behavior of the future in various states. -
DefaultPool::run_with: The recommended approach for more intricate asynchronous requirements is to use the
DefaultPool::run_withmethod from ourpal_asynccrate. This method takes a custom async function and runs it to completion. This allows you to write custom code using regular async/await syntax, combinators,joins,selects, or whatever you wish.
Dev Tools / Utilities
While most tasks in the OpenVMM repo can be accomplished directly via standard
Rust tooling (i.e: cargo run, cargo build), there are many dev tasks that
don't neatly fall under the cargo umbrella. e.g:
- running code formatters / linters
- orchestrating multi-stage, multi-component OpenHCL builds
- running different kinds of test suites
- building/downloading test images for VMM testing
- setting up git hooks
- etc...
The following chapter discusses some of the various dev-facing tools / utilities you may encounter and/or find useful when working on OpenVMM.
Rust-based Tooling
As with many projects, OpenVMM initially took the simple approach of spinning up ad-hoc Bash/Python scripts, and hand-written YAML workflow automation.
This worked for a while... but as the project continued to grow, our once small and focused set of scripts evolved into a mass of interconnected dependencies, magic strings, and global variables!
To pay down mounting tech debt, and to foster a culture where all devs are empowered to contribute and maintain OpenVMM's project tooling, we have adopted a policy of migrating as much core tooling away from loosely-typed languages (like Bash, Python, and hand-written Workflow YAML), and towards new strongly-typed Rust-based tooling.
cargo xtask
cargo xtask is OpenVMM's "swiss army knife" Rust binary that houses various
bits of project specific tooling.
For more info on how xtask is different from xflowey, see xflowey vs
xtask.
Some examples of tools that you can find under xtask:
cargo xtask fmtimplements various OpenVMM-specific style / linting rulescargo xtask fuzzimplements various OpenVMM-specificcargo fuzzextensionscargo xtask install-git-hookssets up git hooks for developers
This list is not exhaustive. Running cargo xtask will list what tools are
available, along with brief descriptions of what they do / how to use them.
For more information of the xtask pattern, see https://github.com/matklad/cargo-xtask
cargo xflowey
To implement various developer workflows (both locally, as well as in CI), the
OpenVMM project relies on flowey: a custom, in-house Rust library/framework
for writing maintainable, cross-platform automation.
cargo xflowey is a cargo alias that makes it easy for developers to run
flowey-based pipelines locally.
Some particularly notable pipelines:
cargo xflowey build-igvm- primarily dev-tool used to build OpenHCL IGVM files locallycargo xflowey ci checkin-gates- runs the entire PR checkin suite locallycargo xflowey restore-packages- restores external packages needed to compile and run OpenVMM / OpenHCL
xflowey vs xtask
In a nutshell:
cargo xtask: implements novel, standalone tools/utilitiescargo xflowey: orchestrates invoking a sequence of tools/utilities, without doing any non-trivial data processing itself
VmgsTool
OpenHCL VMs store their firmware state and attributes (UEFI variables) in a special VM Guest State (VMGS) file. The OpenHCL interacts with and persists data in the VMGS file on behalf of the VM. The VMGS file is packaged as a VHD which the host OS interacts with. For Confidential OpenHCL VMs, this VHD can be encrypted before VM deployment, so that the host only interacts with an encrypted VHD and hence the file's contents are kept confidential from the host.
The VMGS file contains several elements called "files" (these are not strictly files, simply "chunks of data”, logical groupings of data). Each "file" has a unique, well known index; for example, vTPM state is stored in file id "3".
The VmgsTool is a tool that allows for offline manipulation of a VMGS (version 3) file for provisioning and debugging purposes. Basically, it's a tool to interact with the VMGS file, and it can help you perform operations such as reading, creating, modifying and removing "files" from the VMGS file and even creating an encrypted datastore to allow certain "files" to be encrypted as the scenario requires it.
Alternatively: Pre-Built Binaries
If you would prefer to use VmgsTool without building it from scratch, you can download pre-built copies of the binary from OpenVMM CI.
Simply select a successful pipeline run (should have a Green checkbox), and
scroll down to select an appropriate *-vmgstool artifact for your particular
architecture and operating system.
Running
Note: The examples in this section use the Windows executable
vmgstool.exe, which can be replaced with the Linux executablevmgstool. Developers who have already setup their development environment may also use the appropriatecargo runcommand. For more details on building, see the build section below.
The VmgsTool commands are always evolving, so use vmgstool.exe --help to see the
most up to date information about the available commands. Options for each command
and subcommand are also available. For example: vmgstool.exe uefi-nvram dump --help
Read and Write Raw Data
To read raw data from a VMGS file, use the dump command. For example, to
export the decrypted binary contents of the BIOS_NVRAM (--fileid 1) to a file:
vmgstool.exe dump --filepath <vmgs file path> --keypath <key file path> --datapath <data file path> --fileid 1
To write raw data to a VMGS file, use the write command. For example, to write
those NVRAM variables to a different, unencrypted VMGS file:
vmgstool.exe write --filepath <vmgs file path> --datapath <data file path> --fileid 1
Read and Parse UEFI NVRAM Variables
Furthermore, the VmgsTool contains parsers to help debug issues with the UEFI NVRAM variables stored in the VMGS FileId 1 (BIOS_NVRAM). For example, to dump the NVRAM variables for an encrypted VMGS file, truncating the binary data contents of variables without parsers:
vmgstool.exe uefi-nvram dump --filepath <vmgs file path> --keypath <key file path> --truncate
Delete Boot Variables to Recover a VM that Fails to Boot
A VM may fail to boot if the disk configuration changes and
UEFI's DefaultBootAlwaysAttempt setting is disabled.
Deleting the existing (invalid) boot entries using VmgsTool
will trigger a default boot (which attempts to boot all available partitions and devices).
To print the boot entries in an encrypted VMGS file:
vmgstool.exe uefi-nvram remove-boot-entries --filepath <vmgs file path> --keypath <key file path> --dry-run
To actually remove the boot entries from the VMGS file, remove --dry-run.
This will remove all Boot#### variables and the BootOrder variable.
If you would like to remove a specific boot entry or any other UEFI NVRAM variable,
use remove-entry. For example, to remove Boot0000:
vmgstool.exe uefi-nvram remove-entry --filepath <vmgs file path>--keypath <key file path> --name Boot0000 --vendor 8be4df61-93ca-11d2-aa0d-00e098032b8c
Troubleshooting
Expected at least N more bytes, but only found M
If you get an error similar to the one below, it is likely that you are trying to read an encrypted VMGS file and haven't provided the correct decryption key.
ERROR: remove_boot_entries error
Caused by:
    0: error loading data from Nvram storage
    1: unexpected EOF. expected at least 2330702412 more bytes, but only found 30067
Building
Prior to building VmgsTool, please ensure you have built either OpenVMM or OpenHCL at least once, to ensure you have all necessary build dependencies installed.
VmgsTool can be built with cargo build -p vmgstool for Windows and Linux.
To interact with encrypted VMGS files, you will need to compile with the
appropriate encryption feature.
Windows: cargo build --features "encryption_win" -p vmgstool
Linux/WSL2: cargo build --features "encryption_ossl" -p vmgstool
guest_test_uefi
guest_test_uefi is a minimal no_std + alloc EFI application which hosts
a variety of OpenVMM-specific "bare metal" unit tests.
Want to write to an arbitrary MMIO/PIO address? Go for it! It's just you, the VM, and the (very unobtrusive) UEFI runtime!
Building + Running
guest_test_uefi must be built for *-unknown-uefi targets. These are not
installed by default, so you'll need to install the correct target via rustup.
For example:
rustup target add x86_64-unknown-uefi
Since this code runs in the guest, the built .efi binary needs to get packaged
into a disk image that UEFI can read.
To streamline the process of obtaining such a disk image, cargo xtask includes
a helper to generate properly formatted .img files containing a given .efi
image. e.g:
# build the UEFI test application
cargo build -p guest_test_uefi --target x86_64-unknown-uefi
# create the disk image
cargo xtask guest-test uefi --bootx64 ./target/x86_64-unknown-uefi/debug/guest_test_uefi.efi
# test in OpenVMM
cargo run -- --uefi --gfx --hv --processors 1 --disk memdiff:./target/x86_64-unknown-uefi/debug/guest_test_uefi.img
Protip: this is a generic UEFI binary, and can be run outside of the OpenVMM repo as well (e.g: in QEMU, Hyper-V, etc...)!
To convert the raw .img into other formats, qemu-img is very helpful:
# Adjust for the target architecture and type of the build
OVMM_UEFI_TEST_IMG_DIR=./target/x86_64-unknown-uefi/debug
# VmWare
qemu-img convert -f raw -O vmdk ${OVMM_UEFI_TEST_IMG_DIR}/guest_test_uefi.img ${OVMM_UEFI_TEST_IMG_DIR}/guest_test_uefi.vmdk
# Hyper-V
qemu-img convert -f raw -O vhdx  ${OVMM_UEFI_TEST_IMG_DIR}/guest_test_uefi.img ${OVMM_UEFI_TEST_IMG_DIR}/guest_test_uefi.vhdx
# The files:
ls -la $OVMM_UEFI_TEST_IMG_DIR/{*.img,*.vhdx,*.vmdk}
Contributing
This chapter discusses various things developers should be aware of prior to submitting changes to the OpenVMM project.
This includes both code-level coding conventions, as well as instructions on properly submitting changes to the OpenVMM GitHub repo.
Coding conventions
One of our major goals with OpenVMM is to provide a high quality coding experience for contributors, starting first-and-foremost by having a consistent set of coding conventions in the project.
Do your part and keep OpenVMM clean!
rustfmt
Checked Automatically: Yes (via cargo xtask fmt rustfmt)
OpenVMM source must be formatted using rustfmt, which automatically and mechanically applies standard formatting to all the code. This eliminates time spent discussing or reviewing stylistic issues in pull requests.
The CI will run rustfmt --check to enforce consistent formatting, and will
fail if it notices any discrepancies.
Unfortunately, rustfmt isn't infinitely customizable, and there are several
rules that are must be manually enforced:
- All lines must end with LF, not CRLF.
- Top-level
useimports should be non-nested.
NOTE: Some of these manually-enforced conventions were introduced late into OpenVMM's development, and there may be chunks of the codebase that do not adhere to these conventions.
If you're working in a file and notice that it isn't following a certain convention, please take a moment to fix it!
Assuming you've followed the suggested dev env setup
and set up rust-analyzer to format-on-save, you should rarely have to think
about formatting in .rs files.
House Rules
Checked Automatically: Yes (via cargo xtask fmt house-rules)
"House-rules" are a set of misc code lints that are specific to OpenVMM, which are enforced using a custom in-house tool:
- enforce the presence of the standard Microsoft copyright header
- enforce in-repo crate names don't use '-' in their name (use '_' instead)
- enforce Cargo.toml files don't include autogenerated "see more keys" comments
- enforce Cargo.toml files don't contain author or version fields
- enforce files end with a single trailing newline
- deny usage of
#[repr(packed)](you want#[repr(C, packed)]) - justify usage of
cfg(target_arch = ...)(useguest_archinstead!) - justify usage of
allow(unsafe_code)with an UNSAFETY comment
Some of these lints are self explanatory, whereas others are described in more detail elsewhere on this page.
Unused Cargo.toml Dependencies
Checked Automatically: Yes (via cargo xtask fmt unused-deps)
We have an in-repo fork of
cargo-machete that ensures
Cargo.toml files only include dependencies that are actually being used.
Avoiding unused dependencies makes it easier to reason about what a crate is doing just by looking at its dependencies, and also helps cut-down on incremental compile times.
Formatting (Cargo.toml)
Checked Automatically: No
When defining dependencies in Cargo.toml files, please organize dependencies
into the following groups:
- crate-specific "subcrates"
- crates under vm/
- crates under vm/vmcore/
- crates under support/
- external dependencies
The rationale here is that crates should be grouped according to how related to how widely applicable they are. i.e: crates from crates.io and support are widely applicable outside of OpenVMM, whereas crates under vmcore/ only make sense within the context of OpenVMM, and crate-specific subcrates are - by definition - only applicable to the crate they are being imported from.
Additionally, we make use of the
workspace dependencies
feature to ensure that all our dependencies stay in sync. This requires defining
dependencies in your crate's Cargo.toml file and in the project's root Cargo.toml.
So, for example:
[package]
name = "openvmm"

[dependencies]
# crate-specific subcrates
openvmm_core.workspace = true
...

# /vmcore
vmcore.workspace = true
...

# /vm/devices
firmware_uefi_custom_vars.workspace = true
storvsp.workspace = true
...

# /support
guid.workspace = true
inspect.workspace = true
inspect_proto.workspace = true
...

# external dependencies
anyhow.workspace = true
cfg-if.workspace = true
clap.workspace = true
...
Linting (via clippy)
Checked Automatically: Yes
OpenVMM uses cargo clippy to
supplement rustc's built-in lints.
Assuming you've followed the guide and set up rust-analyzer to
use clippy, you should see clippy lints
appear inline when working on Rust code.
The CI runs cargo clippy on every crate in the repo prior to building the
project, and will fast-fail if it catches any warnings / errors.
Suppressing Lints
In general, lints should be fixed by modifying the code to satisfy the lint.
However, there are cases where a lint may need to be allow'd inline.
In these cases, you must provide a inline comment providing reasonable justification for the suppressed lint.
e.g:
#![allow(unused)]
fn main() {
// x86_64-unknown-linux-musl targets have a different type defn for
// `libc::cmsghdr`, hence why these lints are being suppressed.
#[allow(clippy::needless_update, clippy::useless_conversion)]
libc::cmsghdr {
    cmsg_level: libc::SOL_SOCKET,
    cmsg_type: libc::SCM_RIGHTS,
    cmsg_len: (size_of::<libc::cmsghdr>() + size_of_val(fds))
        .try_into()
        .unwrap(),
    ..std::mem::zeroed()
}
}
OpenVMM's clippy Configuration
We stick fairly close to the default set of rustc / clippy lints, though there are some default lints that we've decided to disabled project wide, and other non-default lints which we've explicitly opted into.
See the [workspace.lints] sections of OpenVMM's root
Cargo.toml
for a list of globally enabled/disabled lints, along with justification as to
why certain lints have been enabled/disabled.
Unsafe Code Policy
Preface: When possible, try to avoid introducing new
unsafecode!Before rolling your own
unsafecode, check to see if a safe abstraction already exists, either in-tree, on crates.io*, or in the standard library.*subject to an unsafe-code audit
Rather than synthesizing our own unsafe code conventions, we follow the guidelines outlined in the following two resources:
In a nutshell:
unsafefunctions are required to include/// # Safetydocumentation describing any preconditions the caller must uphold when calling the function.unsafe {}blocks are required to include a// SAFETY:comment describing how the preconditions for calling theunsafefunction(s) within the block are being satisfied.allow(unsafe_code)annotations are required to include an// UNSAFETY:comment justifying why the code in question needs to useunsafe. This annotation must be placed at the module or crate level.
These requirements are enforced by CI, and will cause the build to fail if required documentation is missing.
Editing a file containing unsafe code will trigger CI to automatically add the OpenVMM Unsafe Approvers group to your PR. This is to ensure that all unsafe code is audited for correctness by area experts.
Uses of cfg(target_arch = ...) must be justified
Checked Automatically: Yes (via cargo xtask fmt house-rules)
Unless you're working on something that's genuinely tied to the host's CPU
architecture, you should use cfg(guest_arch = ...) instead of cfg(target_arch = ...).
OpenVMM is a multi-architecture VMM framework, capable of running running x64 guests on a x64 host, as well as Aarch64 guests on Aarch64 hosts (with the potential of adding additional platforms in the future).
At the moment, OpenVMM requires that the host architecture and guest architecture match. That said, it's possible that at some point in the future, OpenVMM may also support mismatched guest/host architectures, via an emulated CPU virtualization backend (akin to QEMU).
Having an emulated CPU backend would enable OpenVMM to support such useful scenarios as:
- running Arch64 guests on x86 machines
- running x86 guests on ARM
- running something exotic (e.g: RISC-V) on x86/ARM machines
- ...assuming we had the bandwidth to implement + maintain something like that
- running OpenVMM on systems without hardware-accelerated CPU virtualization enabled
With these scenarios in mind, it would be short-sighted to rely entirely on
cfg(target_arch = ...) to gate guest-facing arch-specific functionality, as it
would inexorably tie the guest's arch to the host's arch, making any future
initiatives to pry the two apart significantly more difficult!
As such, the OpenVMM repo includes infrastructure to specify a custom,
OpenVMM-specific cfg(guest_arch = ...) cfg parameter.
By default, cfg(guest_arch = ...) will act the same way as cfg(target_arch = ...), but it can be swapped to a different architecture by setting the
OPENVMM_GUEST_TARGET env var at compile-time.
There are very few reasons to use cfg(target_arch = ...) within the OpenVMM
repo, and to enforce this rule, we have an in-house xtask fmt house-rules
check that lints each use of cfg(target_arch = ...) to include a
"justification" for why it's being used.
e.g: cfg(target_arch = ...) would be applicable when feature-gating a CPU
intrinsic (such as CPUID, or a SIMD instruction), or when implementing a
*-sys crate where the underlying C API/ABI varies between architectures.
...otherwise, use cfg(guest_arch = ...)!
Avoid Default when using zerocopy::FromZeroes
Checked Automatically: No
The rule:
- A type can
derive(Default)XORderive(FromZeroes). - A type that is
FromZeroescan alsoimpl Default, but it must be a conscious, explicit choice, with justification (read: inline comment) as to why that particular default value was chosen.
The why:
- The all-zero type is often not a semantically valid
Defaultvalue for a type - There are plenty of types that don't have a
Defaultvalue, but do have a valid all-zero repr
Additional context
As per the Rust docs for Default::default:
fn default() -> SelfReturns the “default value” for a type.
Default values are often some kind of initial value, identity value, or anything else that may make sense as a default.
Notably, default should not be used as some shorthand to "zero initialize"
values! For most non-trivial structs, the all-zero representation is not a
semantically valid Default!
This is true in many contexts... but one that's particularly relevant in OpenVMM is that of FFI via C-style APIs and ABIs.
In C, it's very common for types to undergo multi-stage instantiation, where they are initially allocated as all-zero, and then get "filled in" by some secondary init code. Notably: it's quite rare for that initial "all-zero" struct to be a valid instance of the type!
Example: C FFI
For example, a common pattern in C libraries might look something like:
struct Handle {
    uint16_t opaque_handle;
}

struct Handle handle = {0};
init_handle(&handle);

update_handle(handle, options);
do_thing(handle);
In this example: it would be an error to invoke update_handle or do_thing
with an all-zero handle, as the type hadn't finished being fully initialized.
If we wanted to use this library from Rust, a "naive" approach would be to do something like:
#![allow(unused)]
fn main() {
#[repr(C)]
#[derive(Default)]
struct Handle {
    opaque_handle: u16,
}

let mut handle = Handle::default(); // BAD!
unsafe { init_handle(&handle) };

unsafe { update_handle(handle, options) };
unsafe { do_thing(handle) };
}
While this technically works... using Default here is kinda bogus!
After all - Handle::default() doesn't actually call init_handle, which means
the value returned by default() doesn't match the "promise" of the trait!
Namely: the returned value is not semantically valid yet!
In many other Rust codebase, this "overloading" of Default to represent both
semantically valid value and all-zero values (in FFI) is par for the course,
as once structs get more complicated, having a derive that is able to fully
init a "uninitialized" struct in-memory is quite handy...
In OpenVMM, we don't do this. Instead, we use a separate trait to init all-zero structs.
In OpenVMM, we use FromZeroes and FromZeroes::new_zeroed() to work with types
that have valid all-zero representations, without implying that those types
also have valid all-zero default values!
So, for the example above:
#![allow(unused)]
fn main() {
#[repr(C)]
#[derive(zerocopy::FromZeroes)]
struct Handle {
    opaque_handle: u16
}

let mut handle = Handle::new_zeroed(); // GOOD!
unsafe { init_handle(&handle) };
}
Now, it's impossible for code elsewhere to obtain a Handle via
Handle::default, and mistakenly forget to invoke init_handle on it.
...but if it so happens that we do want a Default impl for Handle, we can
do so by manually implementing derive(Default) ourselves:
#![allow(unused)]
fn main() {
// Default + FromZeroes: `default` returns fully initialized handle
impl Default for Handle {
    fn default() -> Handle {
        let mut handle = Handle::new_zeroed();
        unsafe { init_handle(&handle) };
        handle
    }
}
}
Avoid Requiring Debug on Traits
Checked Automatically: No
TL;DR: Don't do this:
#![allow(unused)]
fn main() {
trait MyTrait: std::fmt::Debug
}
Implementations of the standard library's Debug trait can be surprisingly large,
and the final binary size of OpenHCL and related binaries is a major concern
for us. Unused implementations of this trait are usually removed during the
optimization process (like all dead code), making this a non-issue. However when
traits, and more specifically trait objects, are involved, the compiler has a
much more difficult time proving that implementations are unused. This can
result in large amounts of functionally dead code ending up in the final
binaries.
If you need to implement Debug for a struct containing such a trait object, you
will need to do so manually, so that you can skip over that field.
Moreover, it's usually not good form to leave tracing statements that log a
struct's Debug representation in production. Prefer tracing just the fields
you're interested in, and/or connecting objects to the Inspect graph.
Crate Naming
Checked Automatically: Yes (via cargo xtask fmt house-rules)
Crates must be named with underscores, not dashes and underscores used in folder names.
- Bad:
my-cool-crate - Good:
my_cool_crate
Rust does not allow dashes in imports, with any dashes getting replaced with underscores when used in the code. Avoiding dashes altogether makes it easier to grep for crate names, and makes things more consistent across the repo.
This convention is enforced by CI
Do not name crates with the words "base, util, common" or other terms that are overly general.
For example, consider a crate that provides a common data structure used by multiple devices:
- Bad:
devices_common - Good:
range_map
Libraries that contain the following eventually become a mishmash of unrelated functionality that is located there for convenience. This blog post goes more in-depth as to why.
Instead, name things based on what they logically provide, like functionality or data types.
Submitting Changes
TODO OSS: specific guidelines are currently being discussed and drafted.
Updating this Guide
We gladly welcome PRs that improve the quality of the OpenVMM guide!
The OpenVMM Guide is written in Markdown, and rendered to HTML using
mdbook. You can find the source-code of
this Guide in the main OpenVMM GitHub repo, in the
Guide/ folder.
For small changes, you can simply click the "Suggest an Edit" button in the top-right corner of any page to automatically open up a GitHub Edit page.
For larger changes, we suggest cloning the repo locally, and previewing changes to Markdown in your editor (Visual Studio Code has good support for this).
Building locally
If you want a full rendered copy of the guide locally, you can build one by installing mdbook:
cargo install mdbook
Then from the root directory of the repo, running:
mdbook serve Guide
And navigating to the localhost URL in your web browser (typically
http://127.0.0.1:3000/)
OpenVMM Features
This section discuss various features that are exclusive to OpenVMM.
CLI
Note: The following list is not exhaustive, and may be out of date. The most up to date reference is always the code itself.
For a full list of command line arguments that can be passed to OpenVMM, run
cargo run -- --help.
--processors <COUNT>: The number of processors. Defaults to 1.--memory <SIZE>: The VM's memory size. Defaults to 1GB.--hv: Exposes Hyper-V enlightenments and VMBus support.--uefi: Boot usingmu_msvmUEFI--pcat: Boot using the Microsoft Hyper-V PCAT BIOS--disk file:<DISK>: Exposes a single disk over VMBus. You must also pass--hv. TheDISKargument can be:- A flat binary disk image
- A VHD file with an extension of .vhd (Windows host only)
- A VHDX file with an extension of .vhdx (Windows host only)
--nic: Exposes a NIC using the Consomme user-mode NAT.--virtio-console: Enables a virtio serial device (via the MMIO transport) for Linux console access instead of COM1.--virtio-console-pci: Uses the PCI transport for the virtio serial console.--gfx: Enable a graphical console over VNC (see below)--virtio-9p: Expose a virtio 9p file system. Uses the formattag:root_path, e.g.myfs:C:\\. The file system can be mounted in a Linux guest usingmount -t 9p -o trans=virtio tag /mnt/point. You can specify this argument multiple times to create multiple file systems.--virtio-fs: Expose a virtio-fs file system. The format is the same as--virtio-9p. The file system can be mounted in a Linux guest usingmount -t virtiofs tag /mnt/point. You can specify this argument multiple times to create multiple file systems.
And serial devices can each be configured to be relayed to different endpoints:
--com1/com2/virtio-serial <none|console|stderr|listen=PATH>none: Serial output is dropped.console: Serial input is read and output is written to the console.stderr: Serial output is written to stderr.listen=PATH: A named pipe (on Windows) or Unix socket (on Linux) is set up to listen on the given path. Serial input and output is relayed to this pipe/socket.
Interactive Console
By default, OpenVMM will connect the guests's COM1 serial port to the current terminal session, forwarding all keystrokes directly to the VM.
To enter OpenVMM's interactive command mode, launch OpenVMM, and type ctrl-q.
You can then type the following commands (followed by return):
Note: The following list is not exhaustive and may be out of date. The most up to date reference is always the code itself. For a full list of commands, please invoke the
helpcommand.
q: quit. Note--sometimes this does not work due to a bug in the virito serial teardown path. In this case, type Ctrl-C to exit after runningq.I: re-enter interactive mode.i<LINE>: inputLINEto the active serial console.R: restart worker (experimental)n: inject NMIs: print stateh: print hv statep: pauser: resumed [-ro] [-path <INDEX>] [-target <INDEX>] [-lun <INDEX>] [-ram <Size>] <PATH>: hot add the disk at<PATH>to the VM. Requires--hvx [-r] [path]: inspect runtime state using theInspecttrait infrastructurehelp: help
Graphical Console
OpenVMM supports a graphical console exposed via VNC. To enable it, pass --gfx
on the command line--this will start a VNC server on localhost port 5900. The
port value can be changed with the --vnc-port <PORT> option.
OpenVMM's VNC server also includes "pseudo" client-clipboard support, whereby the "Ctrl-Alt-P" key sequence will be intercepted by the server to type out the contents of the VNC clipboard.
Once OpenVMM starts, you can connect to the VNC server using any supported VNC client. The following clients have been tested working with OpenVMM:
Once you have downloaded and installed it you can connect to localhost with
the appropriate port to see your VM.
OpenVMM Logging
Configuring the logging messages to emit
To configure logging, use the OPENVMM_LOG environment variable. For example:
Enables debug events from all modules:
set OPENVMM_LOG=debug
Enables trace events from the mesh crate and info events from everything else:
set OPENVMM_LOG=info,mesh=trace
This is backed by the
EnvFilter
type; see the associated documentation for more details.
Capturing the ETW traces on the host
On Windows, OpenVMM also logs to ETW, via the Microsoft.HvLite provider.
To capture the trace first need to start the session:
logman.exe start trace <SessionName> -ow -o FileName0.etl -p "{22bc55fe-2116-5adc-12fb-3fadfd7e360c}" 0xffffffffffffffff 0xff -nb 16 16 -bs 16 -mode 0x2 -ets
For OpenHCL traces, use
{AA5DE534-D149-487A-9053-05972BA20A7C}as the provider GUID.
To flush:
logman.exe update <SessionName> -ets -fd
To stop:
logman.exe stop <SessionName> -ets
To decode as CSV:
tracerpt.exe <FileName0>.etl -y -of csv -o <FileName1>.csv -summary <FileName2>.summary
OpenHCL Features
This section discuss various features that are exclusive to OpenHCL.
Diagnostics
This chapter discusses several of the diagnostic tools available when working with OpenHCL.
Preface: CVM restrictions
When OpenHCL detects that it is running as a Confidential VM it will restrict the diagnostics it sends to the VM host. This is done in order to prevent any guest secrets from being leaked to the host.
Unless otherwise noted, all of the following restrictions only apply to release builds of OpenHCL for CVMs. The majority of these restrictions will not apply to debug builds of OpenHCL.
This is controlled by the
enable_debugflag in the IGVM JSON definition.
Simulating CVM restrictions
Most of these restrictions can be simulated on a non-CVM OpenHCL VM by setting the
OPENHCL_CONFIDENTIAL environment variable to 1, either in your IGVM JSON definition or by
using the Set-VmFirmwareParameters cmdlet. This environment variable will cause OpenHCL to
behave as if it is running in a CVM for the purpose of diagnostics.
Tracing
Tracing statements and spans will still be sent to the host, and therefore will still show up in ETW traces and Kusto. However, individual statements must opt in to being logged inside a CVM, as a way of affirming that they do not leak any guest secrets.
For Developers:
This is done by using the CVM_ALLOWED
constant provided by the cvm_tracing crate. cvm_tracing also provides a CVM_CONFIDENTIAL
constant, to mark statements that could contain secrets and should not be logged in a CVM.
Examples:
#![allow(unused)]
fn main() {
use cvm_tracing::{CVM_ALLOWED, CVM_CONFIDENTIAL};

tracing::info!(CVM_ALLOWED, foo, ?bar, "This statement will be logged in a CVM");
tracing::info!(baz, "This statement will not be logged in a CVM");
tracing::info!(CVM_CONFIDENTIAL, super_secret, "This statement will also not be logged in a CVM");

// This also works with spans.
let span = tracing::info_span!("a span", CVM_ALLOWED);
my_func.instrument(span).await;

// And the #[instrument] macro.
#[instrument(name = "foo", fields(CVM_ALLOWED))]
fn my_func() {
    // ...
}
}
Some of the tracing macros will not accept
cvm_tracing::CVM_ALLOWEDas an argument, you will need touse cvm_tracing::CVM_ALLOWEDand then use justCVM_ALLOWED.
ohcldiag-dev
Most ohcldiag-dev commands will not work when connecting to a CVM.
One notable exception is the inspect command (albeit with restrictions).
inspect
The available inspect nodes for a CVM are restricted to prevent exposing guest data.
The vm/ top-level node is inaccessible, however most nodes containing
information about the VTL2 processes are still available.
Crash information
Crash dumps can leak quite a bit of information, and as such, are heavily restricted in CVMs.
Dumps
Crash dumps will not be generated when a crash occurs in a CVM's VTL2.
Hyper-V MSRs
The Hyper-V crash MSRs will still be set when a crash occurs in a CVM's VTL2, but the data values will be sanitized to prevent leaking guest secrets. This will result in Hyper-V logging that a crash occurred, but there will be no debugging information available.
NOTE: This restriction also applies to debug builds of OpenHCL when running a CVM.
NOTE: This restriction cannot be simulated using
OPENHCL_CONFIDENTIAL.
Saved state
Extracting the save state of a CVM is not supported. This applies both to the ohcldiag-dev save command,
and to the save-on-crash registry key.
ohcldiag-dev
OpenHCL includes a "diag server", which provides an interface to diagnose and interact with the OpenHCL binary and user-mode state.
ohcldiag-dev is the "move-fast, break things" tool used by the core OpenHCL
dev team, and as such, it makes NO stability guarantees as to the specific
format of the CLI, output via stdout/stderr, etc...
That is to say:
ANY AUTOMATION THAT ATTEMPTS TO USE ohcldiag-dev WILL EVENTUALLY BREAK!
Examples
Check OpenHCL version
You can inspect a running OpenHCL VM with ohcldiag-dev.
PS > .\ohcldiag-dev.exe <vm name> inspect build_info
{
   crate_name: "underhill_core",
   scm_revision: "bd7d6a98b7ca8365acdfd5fa2b10a17e62ffa766",
}
You can use that to validate your VM is running with the OpenHCL image you intended by checking the scm-revision output matches the commit hash of the OpenHCL repo (if building OpenHCL, you can get the commit hash of your repo using git log --max-count=1).
The detailed kernel version information is available from the initial RAM filesystem only:
PS > .\ohcldiag-dev.exe <vm name> run -- cat /etc/kernel-build-info.json
{
  "git_branch": "rolling-lts/underhill/5.15.90.7",
  "git_revision": "55792e0aa5e92ac4450dc10bf032caadc019fd84",
  "build_id": "74486489",
  "build_name": "5.15.90.7-hcl.1"
}
The OpenHCL version information can be read from the filesystem, too:
PS > .\ohcldiag-dev.exe <vm name> run -- cat /etc/underhill-build-info.json
{
    "git_branch": "user/romank/kernel_build_info",
    "git_revision": "a7c4ba3ffcd8708346d33a608f25b9287ac89f8b"
}
Interactive Shell
To get an interactive shell into the VM, try:
ohcldiag-dev.exe <vm name> shell
Interactive shell is only available in debug builds of OpenHCL.
Running a command
To run a command non-interactively:
ohcldiag-dev.exe <vm name> run cat /proc/interrupts
Using inspect
To inspect OpenHCL state (via the Inspect trait):
ohcldiag-dev.exe <vm name> inspect -r
kmsg log
The kernel kmsg log currently contains both the kernel log output and the
OpenHCL log output. You can see this output via the
console, if you have it configured, or via ohcldiag-dev:
ohcldiag-dev.exe <vm name> kmsg
If you want a continuous stream of output as new messages arrive, pass the -f
flag:
ohcldiag-dev.exe <vm name> kmsg -f
By default, the OpenHCL logs will only contain traces at info level and
higher. You can adjust this globally or on a module-by-module basis. And you can
set the tracing configuration at startup or dynamically with ohcldiag-dev.
To set the trace filter at startup, add a kernel command line option
OPENVMM_LOG=<filter>. To update it on a running VM, run:
ohcldiag-dev.exe <vm name> inspect trace/filter -u <filter>
The format of <filter> is a series of comma-separated key-value pairs, plus an
optional default, <default-level>,<target>=<level>,<target>=<level>. <level>
can be one of:
tracedebuginfowarnerroroff
<target> specifies the event or span's target, which defaults to the fully
qualified module name (including the crate name) that contains the event, but it
can be overridden on individual trace statements.
So to enable warning traces by default, but debug level for storvsp traces, try:
ohcldiag-dev.exe <vm name> inspect trace/filter -u warn,storvsp=debug
If successful, the new filter will take effect immediately, even if you have an
open kmsg session already.
Network packet capture (PCAP)
PCAP is an industry standard format for capturing network packets. OpenHCL now supports PCAP based packet capture for the network packets that are going through it.
Prerequisites
- PCAP based packet capture support in OpenHCL came in around Nov 2023. The easiest
way to check whether the OpenHCL version you are running has PCAP support or not is by
running
ohcldiag-dev -hand if the output shows an option forpacket-capture, then the support is there. Otherwise, pick a newer version of OpenHCL. - OpenHCL PCAP support is only for the synthetic network path. It will likely not show any packets captured if a vNIC is operating in accelerated networking mode. If you would like to capture the network packets for a given vNIC in OpenHCL, disable accelerated networking on the vNIC first.
Packet capture options
To see the options for packet capture, run the help command using:
ohcldiag-dev packet-capture -h
The help should be self explanatory, but further below are some sample commands for reference purposes.
How to stop running packet capture
There are two ways of controlling how long the packet capture runs.
- Use the
-Gor--secondsto specify for how many seconds to run the packet capture for in the command line. If not specified, it runs for the default value, which you can see from the output of the help command above. This option can be handy for example, when doing packet capture on the TiP node, where interacting with the console using keys likeCtrl+cis not possible. - If you would like to keep the packet capture running indefinitely, specify a big value
for the
-Goption. You can then stop the capture at any time using theCtrl+ckey.
Packet capture traces
The packet capture command will generate a pcap file for each vNIC. You can control the
name of the pcap file generated using the -w option. If not specified, the default
value for the file name is shown by the help command above. The index of the vNIC is
appended to the file name. So, for example, the pcap file for the first vNIC would be
<default value>-0.pcap, the second one <default-value>-1.pcap, so on and so forth.
Loading the pcap file for analysis
There are many software that are available to load the pcap file. The most commonly
used one is wireshark. Copy the *.pcap files generated on the test machine and then
open them up on the desired software.
Example packet capture commands:
In all of the below commands, $vmname should be replaced with the actual VM name. On
Azure, the VM name is the same as the container ID.
- Most basic command; run packet capture with all defaults. This will run packet capture for the default values, including the default time (see the help command above for default values).
ohcldiag-dev.exe $vmname packet-capture
- Run packet capture indefinitely and use Ctrl+c to stop.
ohcldiag-dev.exe $vmname packet-capture -G 655555
- Run packet capture with the location of the output location using the
-woption. By default, the traces are captured in the current working dir. That may not always be desirable, especially on TiP. Let's say you want all the output pcap files to go to thec:\testfolder, then you can do something like:
ohcldiag-dev.exe ubuntu packet-capture -w c:\test\nic
The output files will be of the form c:\test\nic-*.pcap
- Specify the length of the packet to capture using the
-sor--snaplenoption. By default, the length of the packet captured can be big and can cause the size of the pcap files to be quite large. It is advisable to only capture the packets for the length that is of interest. For example, to specify only capturing 128 bytes of the packet (which will generally give you the TCP and IP headers), do:
ohcldiag-dev.exe ubuntu packet-capture -s 128
- Run the packet capture for the specified duration in seconds using the
-Goption. For example, to capture packets for 2min, do:
ohcldiag-dev.exe ubuntu packet-capture -G 120
Performance analysis
Besides performance analysis for VTL0 VM and host OS, we'd like to capture trace
inside VTL2 as well. This allows us to analyze the Linux kernel and
openvmm_hcl worker process inside VTL2.
Prerequisite for capturing perf data
The release Linux image doesn't have user mode perf program by default. To capture perf data inside VTL2, it is necessary to build OpenHCL with the below instructions, which will include the necessary programs.
cargo xflowey build-igvm [RECIPE] --release --with-perf-tools
Increase VTL2 memory page count
To capture and save perf data file inside VTL2, we need to increase VTL2's memory page count by increasing the memory_page_count value in the IGVM configuration file (openhcl-x64-dev.json). E.g. increase it to 524288 like:
{
    "vtl2": {
        "underhill": {
            ....................
            "memory_page_count": 524288
        }
    }
}
Capture perf data inside VTL2
While workloads run inside VTL0 VM, use ohcldiag-dev.exe to run perf to capture perf_events profiling data inside VTL2. E.g. the following command captures 15s of perf data and saves it in a file. You can find more info about perf on external page perf Examples
.\ohcldiag-dev.exe <VM Name> run -- perf record -F 999 -a --call-graph=dwarf -o ./openhcl.fio.perf -- sleep 15
Use perf to convert perf data to plain text and dump it to a file on host
.\ohcldiag-dev.exe <VM Name> run -- perf script -i ./openhcl.fio.perf > .\traces\openhcl.fio.perf.script
Visualize perf profiling data
Please follow up instructions on the external page Flame Graphs to create flame graph SVG file. It requires scripts from FlameGraph GitHub repo, so it is better to do it on WSL2.
Here is an example command on WSL2. It converts the perf script file to SVG file. Both of files are located under d:\tmp\vtl2 folder on Windows.
perf_file=/mnt/d/tmp/vtl2/openhcl.fio.perf.script; cat $perf_file | ./stackcollapse-perf.pl > $perf_file.folded; cat $perf_file.folded | ./flamegraph.pl > $perf_file.svg
If the perf script file doesn't have rust functions demangled correctly, please add rustfilt in the pipe to assist demangling.
perf_file=/mnt/d/tmp/vtl2/openhcl.fio.perf.script; cat $perf_file | rustfilt | ./stackcollapse-perf.pl > $perf_file.folded; cat $perf_file.folded | ./flamegraph.pl > $perf_file.svg
OpenHCL Tracing
Using ohcldiag-dev
ohcldiag-dev offers several methods for collecting
different sorts of traces from OpenHCL.
We suggest starting here, before exploring some of the other options presented on this page.
(Advanced) Enable Linux Kernel Tracing
Sometimes it can be useful to extract additional information from the kernel during runtime. By default the config OpenHCL uses does not support tracing; as such you will need to build a custom kernel with tracing support. First, see the Kernel Development section of the docs to find the repo. To set up a tracing enabled kernel:
- Find
CONFIG_FTRACEin Microsoft/hcl-dev.config and change it fromCONFIG_FTRACE is not settoCONFIG_FTRACE=y. - Build the kernel using the Microsoft/build-hcl-kernel.sh script.
- In the loader json you intend to use, change the
kernel_pathentry to point to your newly built vmlinux. This can usually be found at linux-dom0-hyperv/out/vmlinux. - Build OpenHCL using
cargo xflowey build-igvm --custom-kernel path/to/vmlinux. - When launching your OpenHCL vm, be sure to Set-VmFirmwareParameters
correctly. The following is an example that enables tracing hyper-v linux
components such as vmbus:
tp_printk=1 trace_event=hypervtp_printk=1tells the kernel to print traces to the kernel log.trace_events=<module>tells the kernel which module traces to print.
[Hyper-V] Saving traces to the Windows event log
The OpenHCL traces can be saved to the Windows event log on the host. That is not meant to be a production scenario due to resource consumption concerns. By default, only ETW is emitted.
Setting PersistentGel under the virt. key (HKLM:SOFTWARE\Microsoft\Windows NT\CurrentVersion\Virtualization)
to 1 (REG_DWORD) makes the messages being stored to the host event log, too, to make getting traces
easier in the development scenarios. The traces will be stored under the Hyper-V Worker Operational log.
Here is a Powershell one-liner to enable that developer aid:
New-ItemProperty "HKLM:SOFTWARE\Microsoft\Windows NT\CurrentVersion\Virtualization" -Name "PersistentGel" -Value 1 -Type Dword -Force
Note: the key has to be set prior to starting the VM to save the logging messages sent by VTL2 running inside that VM to the Windows event log.
To retrieve the events with Powershell, start with this one-liner and tweak it to your needs:
Get-WinEvent -FilterHashtable @{ LogName='Microsoft-Windows-Hyper-V-Worker-Operational'; ProviderName='Microsoft-Windows-Hyper-V-Chipset' }
Hardware Debugging (gdbstub)
Think EXDI from Hyper-V, except instead of using the EXDI interface, we use the
GDB Remote Serial Protocol
(via the gdbstub Rust library).
Hardware debugging has several benefits over using an in-guest / in-kernel debugger:
- Debugging early-boot scenarios (before UEFI / Windows / Linux debuggers are set up)
- Debugging low-level ISRs
- Non-intrusive debugging = easier to repro certain bugs
- Debugging SNP/TDX/VBS Confidential VMs
Enabling the Debugger
OpenVMM
- Pass the
--gdb <port>flag at startup to enable the debug worker. e.g.,--gdb 9001
To pause the VM until the debugger has been attached, pass --paused at startup.
OpenHCL
- Pass the
OPENHCL_GDBSTUB=1OPENHCL_GDBSTUB_PORT=<gdbstub port>parameters to enable gdbstub. e.g.,Set-VmFirmwareParameters -Name UhVM -CommandLine OPENHCL_GDBSTUB=1 OPENHCL_GDBSTUB_PORT=5900. - To expose a TCP port, run
ohcldiag-dev.exe <name> vsock-tcp-relay --allow-remote --reconnect <gdbstub port> <tcp port>.
To pause VTL0 boot until desired, pass OPENHCL_VTL0_STARTS_PAUSED=1 as a parameter. Then once the debugger is attached, you can start VTL0 with ohcldiag-dev.exe <name> resume.
Connecting via GDB
The quickest way to get connected to a OpenVMM VM is via gdb directly.
Note that GDB does not support debugging PDBs, so if you're trying to debug
Windows, you'll be limited to plain disassembly. See the Connecting via WinDbg section below if this is your use-case.
On the flipside, if you're trying to debug ELF images with DWARF debug info
(e.g., a vmlinux binary), then you'll likely want to use gdb directly, as it
will support source-level debugging with symbols, whereas WinDbg will not.
You can install gdb via your distro's package manager. e.g., on Ubuntu:
sudo apt install gdb
Once gdb is installed, run it, and enter the following gdb command (swapping
9001 for whatever port you specified at the CLI)
target remote :9001
If all goes well, you should get output similar to this:
(gdb) target remote :9001
Remote debugging using :9001
warning: No executable has been specified and target does not support
determining executable automatically.  Try using the "file" command.
0xfffff8015c054c1f in ?? ()
(gdb)
At this point, you can try some basic GDB commands to make sure things are working.
e.g., start / interrupt the VM's execution using cont and ctrl-c
(gdb) cont
Continuing.
^C                                          # <-- hit ctrl-c in the terminal
Thread 1 received signal SIGINT, Interrupt.
0xfffff8015c054c1f in ?? ()
(gdb)
e.g., inspecting register state
(gdb) info registers
rax            0x0                 0
rbx            0x0                 0
rcx            0x40086             262278
rdx            0x0                 0
rsi            0xffff960d4eea5010  -116491073990640
rdi            0x0                 0
rbp            0x0                 0x0
rsp            0xfffff8015b3f5ec8  0xfffff8015b3f5ec8
r8             0x0                 0
r9             0xffffffff          4294967295
r10            0xfffff8015bfff1f0  -8790254554640
r11            0x0                 0
r12            0xffffffff          4294967295
...etc...
e.g., setting data breakpoints
(gdb) awatch *0xfffff804683190e0
Hardware access (read/write) watchpoint 1: *0xfffff804683190e0
e.g., single stepping
0xfffff8047a309686 in ?? ()
(gdb) si
0xfffff8047a309689 in ?? ()
You may find this blog post
useful, as it includes a table of common gdb commands along with their WinDbg
counterparts.
Connecting via WinDbg
WinDbg doesn't understand the GDB Remote Serial Protocol directly, but thankfully, some smart folks over on the WinDbg team have developed a GDB Remote Serial Protocol <-> WinDbg translation layer!
For more information, see Setting Up QEMU Kernel-Mode Debugging using EXDI
Getting this working with OpenVMM or OpenHCL is as easy as following the guide, except you'll need to enable our debugger instead of running QEMU.
It's easiest to connect through the GUI. The steps are relatively simple: Open Windbgx -> File -> Attach to kernel -> EXDI. On the form, fill out:
- Target Type:
QEMU - Target Architecture:
X64 - Target OS:
Windows - Image Screening heuristic size:
0xFFFE - NT - Gdb server and port:
<server>:<port>e.g.,127.0.0.1:1337(use whatever port you set above)
Known WinDbg Bugs
- Hardware breakpoints are issued with
ba. TheAccess Sizeparameter is incorrectly multiplied by 8 when sent to the stub. Consequently, it must be set to 1. - Unlike GDB, WinDbg doesn't implicitly set software breakpoints via our offered write_addrs implementation.
Supported Features
At the time of writing (8/16/24) the debugger supports the following operations:
- read/write guest memory
- read guest registers *
- start/interrupt execution
- watchpoints
- hardware breakpoints
- single stepping
TODO Features
If you're looking for work, and want to improve the debugging experience for everyone, consider implementing one or more of the following features:
- * reading all guest registers, including fpu, xmm, and various key msrs
- software breakpoints:
- Intercept guest breakpoint exceptions into VTL2
- writing guest registers
- exposing the OpenVMM interactive console via the
MonitorCmdinterface- Custom commands sent using
monitor(gdb) /.exdicmd(WinDbg) - e.g., being able to invoke
x device/to/inspectdirectly from the debugger
- Custom commands sent using
- any other features supported by the
gdbstublibrary
Kernel Debugging (KDNET)
Kernel Debugging is available for Windows guests via KDNET over VMBus.
Enabling and Starting the Debugger
Set up KDNET on the guest and start the debugger as described on
Set up KDNET network kernel debugging manually | Microsoft Learn.
Setting busparams is not necessary.
With OpenVMM and WHP as Host
Set up the VM for UEFI and VMBus depending on your use case and pass the
additional flag --net consomme:
- Without OpenHCL: Pass the
--uefiflags when starting OpenVMM. - With OpenHCL: Ensure "UEFI Boot" and "VTL2 VMBus Support" are active
Known Issues with KDNET on WHP
- KDNET currently only works with the
consommenetworking option in OpenVMM, howeverconsommewill create a new network adapter in the guest every time OpenVMM is restarted. This can be safely ignored.- KDNET will also connect with
--net vmnic:<ethernet switch id>, but hangs immediately after due to a yet undiagnosed bug in vmbusproxy.
- KDNET will also connect with
- Quitting OpenVMM without shutting down the VM first will prevent the same debugger instance from reconnecting to the guest on next boot. Relauch the debugger to reconnect.
- When launching an OpenHCL VM with KDNET,
virt_whp::synicwill report a constant stream offailed to signal synicerrors for several seconds. These don't appear to affect the VM's functionality and can be ignored.
UEFI: mu_msvm
OpenVMM currently uses the mu_msvm UEFI firmware package in order to support
booting and running modern EFI-boot capable operating systems.
In the future, it would be useful to also support alternative UEFI firmware packages, such as OVMF.
Please reach out of if this is something you may be interested in helping out with!
Two OpenVMM components work in tandem in order to load and run the mu_msvm
UEFI firmware:
-
Pre-boot: the VMM's UEFI firmware loader does 3 things:
- Writes the
mu_msvmUEFI firmware package into guest RAM - Writes VM topology information, and
mu_msvm-specific config data into guest RAM - Initializes register state such that the VM will begin executing from UEFI
- Writes the
-
At runtime: the UEFI code within the Guest interfaces with a bespoke
firmware_uefidevice in order to implement certain UEFI services, such as NVRam variable support, watchdog timers, logging, etc.
Acquiring a copy of mu_msvm
The cargo xflowey restore-packages script will automatically pull down a
precompiled copy of the mu_msvm UEFI firmware from the microsoft/mu_msvm
GitHub repo.
Alternatively, for those that wish to manually download / build mu_msvm:
follow the instructions over on the microsoft/mu_msvm repo, and ensure the
package is extracted into the .packages/ directory in the same manner as the
cargo xflowey restore-packages script.
Hyper-V BIOS
OpenVMM currently relies on proprietary Hyper-V "PCAT"1 BIOS firmware blobs in order to support booting and running various legacy x86 operating systems.
In the future, it would be great if OpenVMM could support alternative, open-source x86 BIOS firmwares, such as SeaBIOS.
Please reach out of if this is something you may be interested in helping out with!
Two OpenVMM components work in tandem in order to load and run the BIOS:
-
Pre-boot: the VMM's BIOS firmware loader writes the PCAT BIOS into guest RAM, and sets up the initial register state such that the VM will begin executing the firmware.
-
At runtime: the BIOS code inside the VM communicates with a bespoke
firmware_pcatvirtual device, which it uses to fetch information about the VM's current topology, and to implement certain BIOS services (such as boot logging, efficient spin-looping, etc).
Acquiring the Hyper-V BIOS Firmware
Unfortunately, due to licensing restrictions, the OpenVMM project is not able to redistribute copies of the proprietary Hyper-V BIOS firmware blob.
That being said - Windows 11 ships copies of the PCAT BIOS firmware in-box under
System32 as either vmfirmwarepcat.dll or vmfirmware.dll. When run on
Windows / WSL2, OpenVMM will automatically scan for these files, and use them if
present.
Fun fact: the term "PCAT" refers to the venerable IBM Personal Computer AT, as a nod to this BIOS's early history as a fairly stock PC/AT compatible BIOS implementation.
Architecture
This chapter discusses the architecture of various key parts of the OpenVMM codebase.
OpenVMM Architecture
This page is under construction
OpenHCL Architecture
Prerequisites:
This page is under construction
Overview
The following diagram offers a brief, high-level overview of the OpenHCL Architecture.
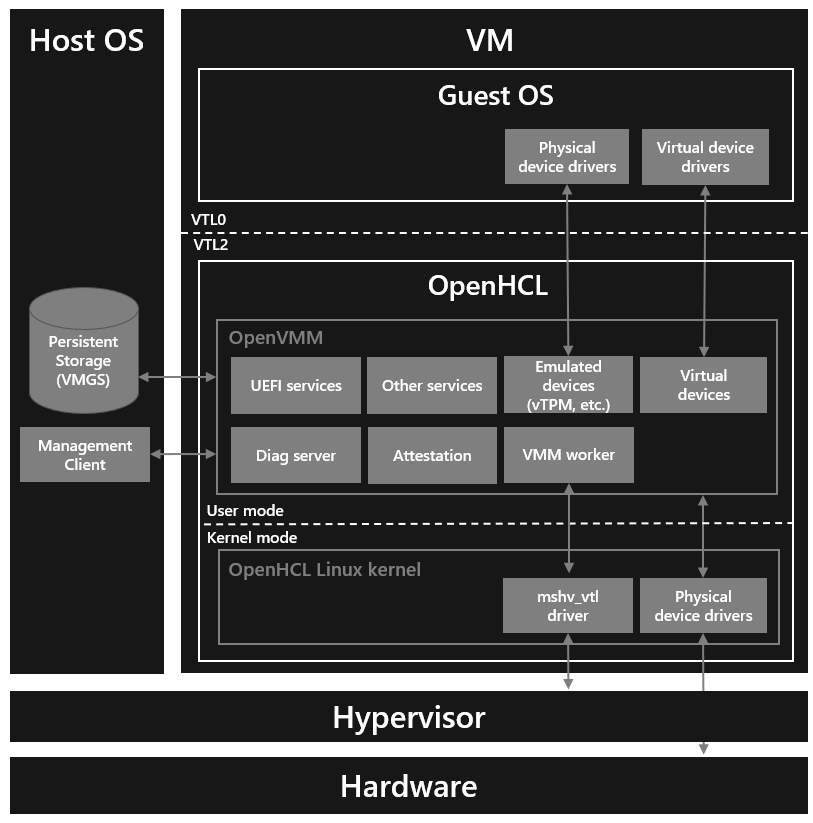
VTLs
OpenHCL currently relies on Hyper-V's implementation of Virtual Trust Levels (VTLs) to implement the security boundaries necessary for running OpenVMM as a paravisor.
VTLs can be backed by:
OpenHCL runs within VTL21, and provides virtualization services to a Guest OS running in VTL0.
OpenHCL Linux
By building on-top of Linux, OpenHCL is able to leverage the extensive Linux software and development ecosystem, and avoid re-implementing various components like core OS primitives, device drivers, and software libraries. As a result: OpenHCL provides a familiar and productive environment for developers.
The OpenHCL Linux Kernel uses a minimal kernel configuration, designed to host a single specialized build of OpenVMM in userspace.
In debug configurations, userspace may include additional facilities (such as an interactive shell, additional perf and debugging tools, etc). Release configurations use a lean, minimal userspace, consisting entirely of OpenHCL components.
Scenario: Azure Boost Storage/Networking Translation
Traditionally, Azure VMs have used Hyper-V VMBus-based synthetic networking and synthetic storage for I/O. Azure Boost introduces hardware accelerated storage and networking. It exposes different interfaces to guest VMs for networking and storage. Specifically, it exposes a new proprietary Microsoft Azure Network Adapter (MANA) and an NVMe interface for storage.
OpenHCL is able to provide a compatibility layer for I/O virtualization on Azure Boost enabled systems.
Specifically, OpenHCL exposes Hyper-V VMBus-based synthetic networking and synthetic storage for I/O to the guest OS in a VM. OpenHCL then maps those synthetic storage and networking interfaces to the hardware accelerated interfaces provided by Azure Boost.
The following diagram shows a high level overview of how synthetic networking is supported in OpenHCL over Microsoft Azure Network Adapter (MANA)
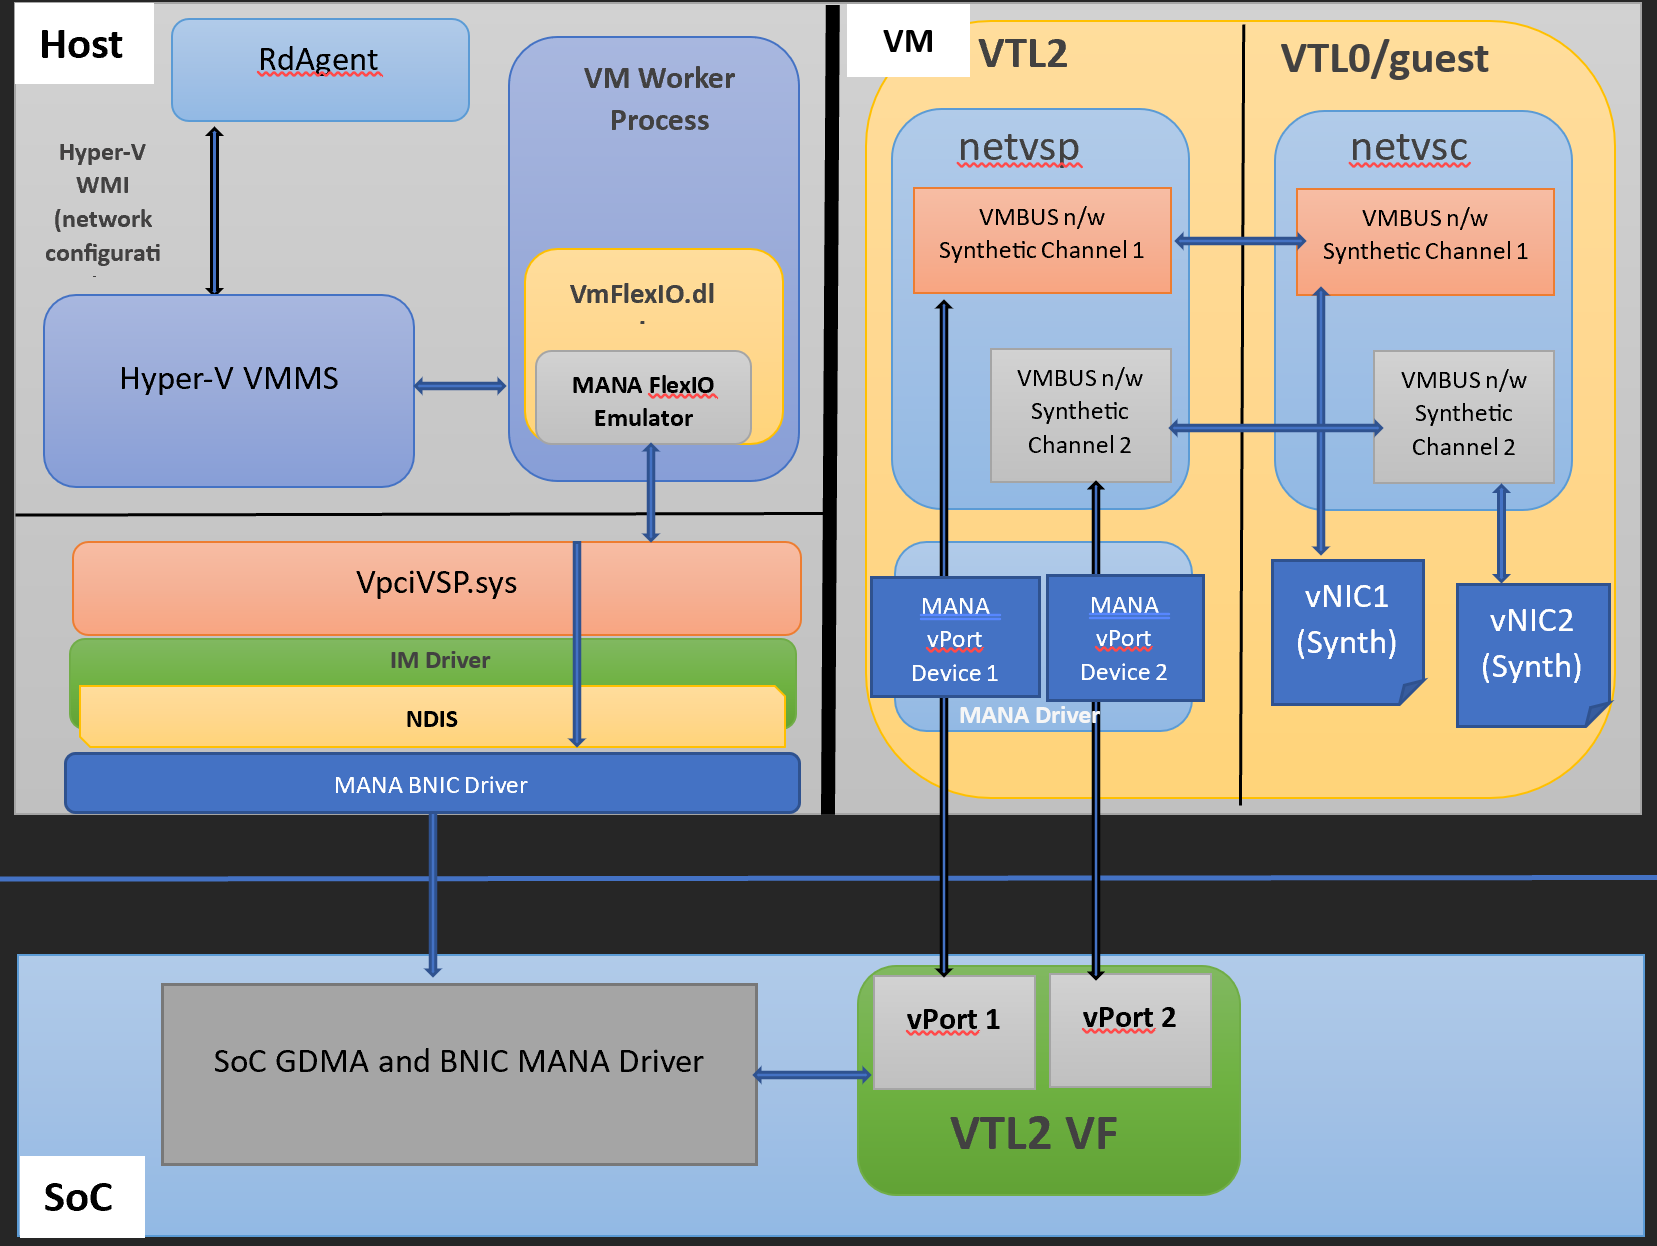
The following diagram shows a high level overview of how accelerated networking is supported in OpenHCL over MANA
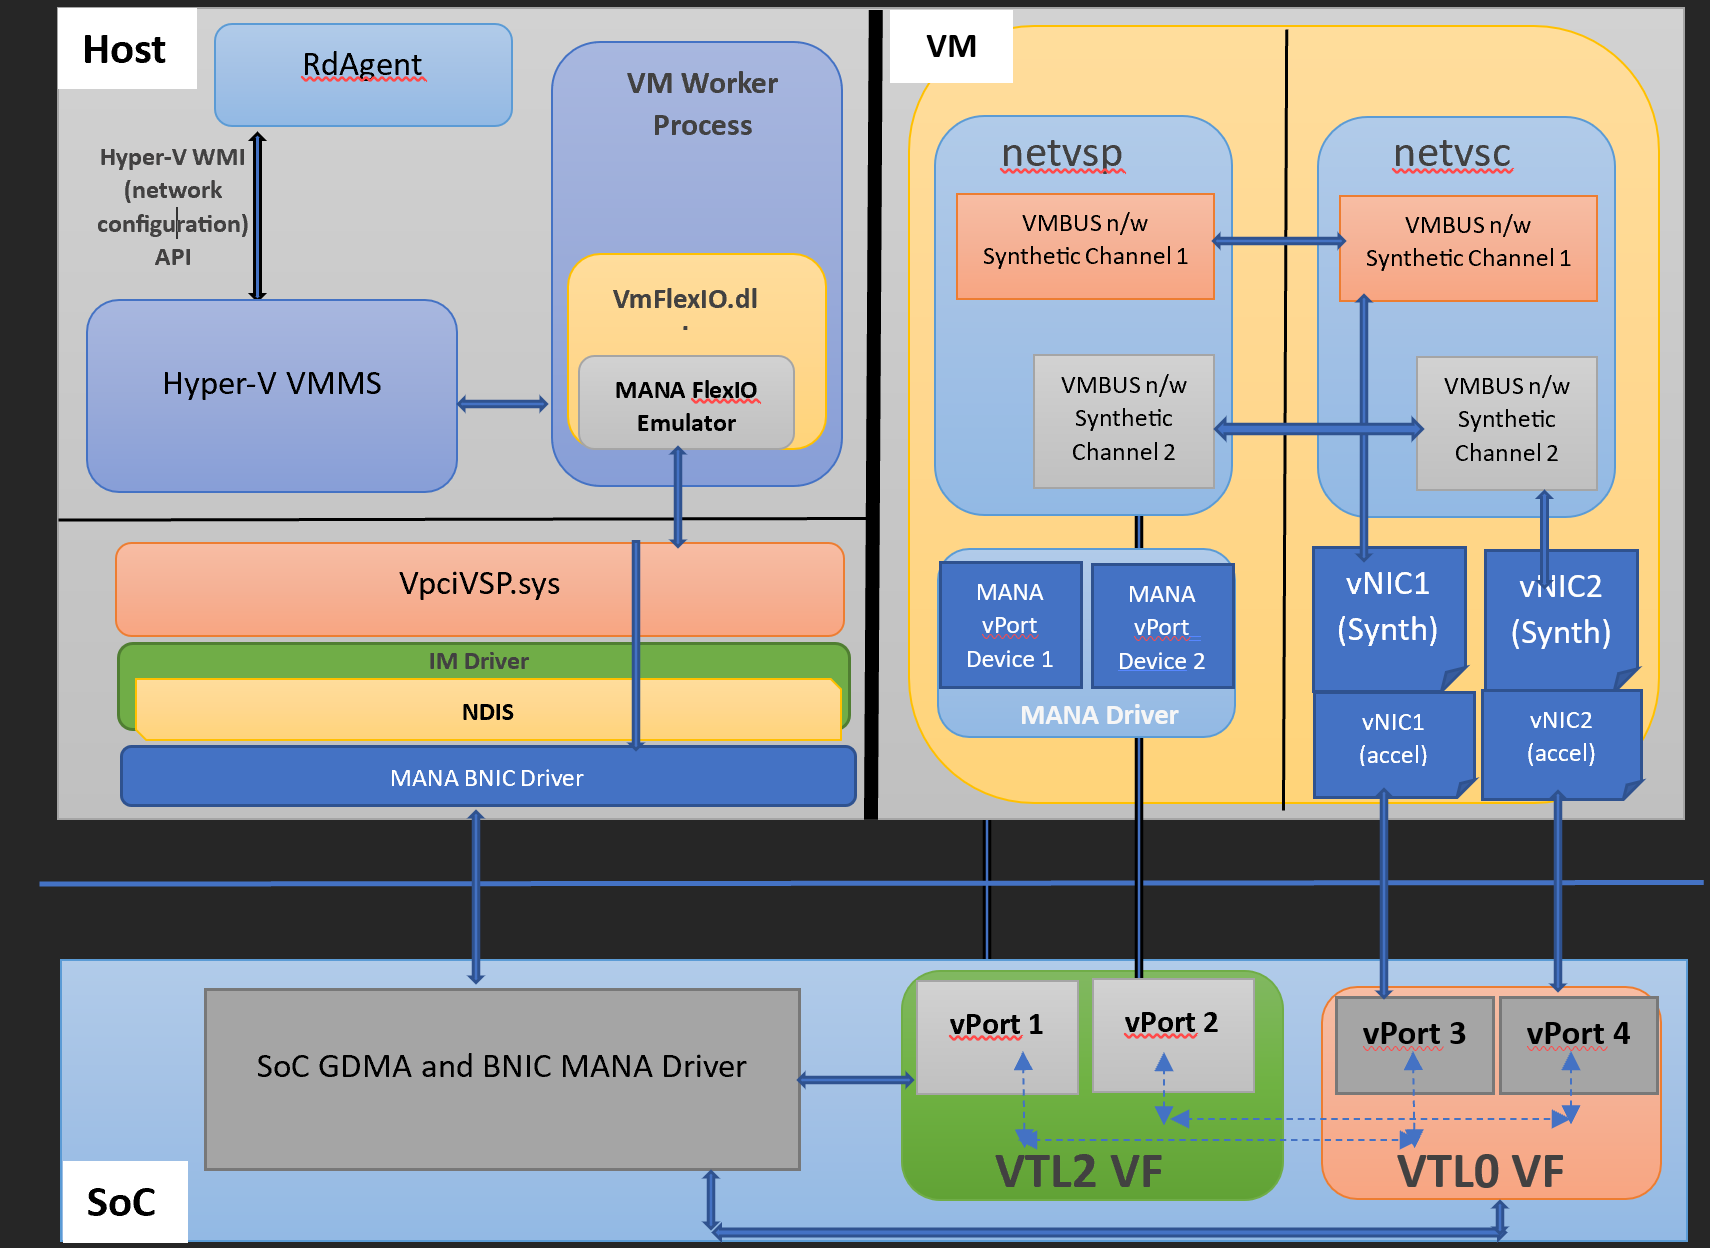
Why not VTL1? Windows already uses VTL1 in order to host the Secure Kernel.